Quantcast
Channel: Andrei Dzimchuk
Viewing all 60 articles
Browse latest View live

Setting up HTTPS endpoints in ASP.NET Core services in Service Fabric

$
0
0

There are a few options for setting up HTTPS access for public facing ASP.NET Core services in Service Fabric. Your choice depends on the web server and whether or not you want to add a web gateway to your topology.

Setting up HTTPS for WebListener

WebListener is Windows-only web server that is built on Http.Sys kernel mode driver. It can be used to expose your web apps and API endpoints directly to the Internet without requiring a reverse proxy as Http.Sys is a mature, robust, secure and tested technology.

First off, you need to make sure that the server certificate is installed on your nodes. You can do that manually on your dev box but you need to automate cert deployment to your cluster running in Azure. You do that be storing the cert in KeyVault and configuring your ARM template as explained here.

You can use a self-signed certificate on your local machine and test clusters but you want to make sure to purchase a CA-signed one for your production clusters.

Then you need to configure Service Fabric to look up the certificate in the local store and set the SSL/TLS binding for your secure endpoints. In your application manifest you add a Certificates section:

<Certificates>
  <EndpointCertificate X509FindValue="[HttpsCertThumbprint]" Name="HttpsCert" />
</Certificates>

And add a binding policy for the secure endpoints defined in your services:

<ServiceManifestImport>
  <ServiceManifestRef ServiceManifestName="BookFast.WebPkg" ServiceManifestVersion="1.0.0" />
  <ConfigOverrides />
  <Policies>
    <EndpointBindingPolicy EndpointRef="ServiceEndpoint" CertificateRef="HttpsCert" />
  </Policies>
</ServiceManifestImport>

Service Fabric relies on netsh http commands to configure HTTPS on a chosen IP and port and this configuration is used by Http.Sys.

ServiceEndpoint is the name of the secure endpoint that is configured in service manifest:

<Resources>
  <Endpoints>
    <Endpoint Protocol="https" Name="ServiceEndpoint" Type="Input" Port="443" />
  </Endpoints>
</Resources>

Notice the HttpsCertThumbprint parameter that was used to specify the cert to look up. Instead of hardcoding the thumbprint you want to take advantage of the per-environment configuration supported in Service Fabric.

Creating a WebListener-based listener is easy with Microsoft.ServiceFabric.AspNetCore.WebListener package:

protected override IEnumerable<ServiceInstanceListener> CreateServiceInstanceListeners()
{
    return new ServiceInstanceListener[]
    {
        new ServiceInstanceListener(serviceContext =>
            new WebListenerCommunicationListener(serviceContext, "ServiceEndpoint", url =>
            {
                ServiceEventSource.Current.ServiceMessage(serviceContext, $"Starting WebListener on {url}");

                return new WebHostBuilder().UseWebListener()
                            .ConfigureServices(
                                services => services
                                    .AddSingleton<StatelessServiceContext>(serviceContext))
                            .UseContentRoot(Directory.GetCurrentDirectory())
                            .UseStartup<Startup>()
                            .UseUrls(url)
                            .Build();
            }))
    };
}

In fact, the Visual Studio template for ASP.NET Core services uses WebListener by default.

Setting up HTTPS for Kestrel

Kestrel is a cross platform web server which is based on libuv. It's new and it's highly recommended to put it behind a reverse proxy when exposing your apps running on it to the wild. Normally the proxy such as IIS or Nginx would handle HTTPS and communicate to Kestrel over plain HTTP.

In Service Fabric you probably want to go with the web gateway approach and make the gateway handle HTTPS. You want to check out Azure Application Gateway which is basically a reverse proxy as a service solution. It provides application layer load-balancing, SSL offload, web firewall and health monitoring of the backend services.

If for whatever reason you still want to expose Kestrel over HTTPS here's how you do it.

Unlike the previous approach with WebListener where you relied on Service Fabric to set up a TLS binding for Http.Sys you need to provide the cert to Kestrel when configuring it. This frees you from having to store the cert in the local machine store on your nodes as you can retrieve it from anywhere (KeyVault, etc) at start-up.

Creating a Kestrel-based listener in Service Fabric is simplified with Microsoft.ServiceFabric.AspNetCore.Kestrel package and it's very similar to the code for the WebListener-based listener shown above. You can configure HTTPS by using the UseKestrel() override on WebHostBuilder that accepts KestrelServerOptions or you can do that when configuring services in your Startup.cs.

public void ConfigureServices(IServiceCollection services)
{
    X509Certificate2 cert = GetCertificate();
    services.Configure<KestrelServerOptions>(options =>
    {
        options.UseHttps(cert);
    });
}

Azure AD B2C user profile editing issues with ASP.NET Core

$
0
0

One of the policy types supported by Azure AD B2C is profile editing which allows users to provide their info such as address details, job title, etc. When you use the default ASP.NET Core OpenID Connect middleware to handle communication with Azure AD B2C you may run into difficulties making it properly redirect to the profile page and then handle the response when being called back by Azure AD.

To invoke a B2C policy your application is expected to make a request to the authorize endpoint passing the required p parameter which identifies the policy. For example, when signing in users you would use either a 'Sign-in' or 'Sign-up or Sign-in' policy type:

GET https://login.microsoftonline.com/devunleashedb2c.onmicrosoft.com/oauth2/v2.0/authorize?p=B2C_1_TestSignUpAndSignInPolicy&client_id=...&redirect_uri=... HTTP/1.1

When redirecting to the profile editing page you would provide a name of your "Profile editing' policy:

GET https://login.microsoftonline.com/devunleashedb2c.onmicrosoft.com/oauth2/v2.0/authorize?p=B2C_1_TestProfileEditPolicy&client_id=...&redirect_uri=... HTTP/1.1

The middleware takes care of providing the rest of the protocol parameters as well as state and nonce values which are used to later validate and correlate the response from Azure AD.

The way you trigger this whole process is by returning a ChallengeResult, e.g.:

public class AccountController : Controller
{
    private readonly B2CPolicies policies;

    public AccountController(IOptions<B2CPolicies> policies)
    {
        this.policies = policies.Value;
    }

    public IActionResult Profile()
    {
        if (User.Identity.IsAuthenticated)
        {
            return new ChallengeResult(
                AuthConstants.OpenIdConnectB2CAuthenticationScheme,
                new AuthenticationProperties(new Dictionary<string, string> { { AuthConstants.B2CPolicy, policies.EditProfilePolicy } })
                {
                    RedirectUri = "/"
                });
        }

        return RedirectHome();
    }

    private IActionResult RedirectHome() => RedirectToAction(nameof(HomeController.Index), "Home");
}

This will make AuthenticationManager invoke the challenge with the middleware identified by the provided authentication scheme (AuthConstants.OpenIdConnectB2CAuthenticationScheme) and in case of the OpenID Connect middleware it should make a request to the authorize endpoint. If you're wondering about the policy parameter I recommend you have a look at my older post explaining how it is used when determining the correct configuration endpoint.

Now, here's the first problem. Instead of being redirected to Azure AD B2C, you are likely to witness an immediate redirect to some AccessDenied action on your AccountController:

GET https://localhost:8686/Account/Profile HTTP/1.1

HTTP/1.1 302 Found
Content-Length: 0
Location: https://localhost:8686/Account/AccessDenied?ReturnUrl=%2F

The problem lies in the middleware that treats challenge responses thrown when there is an authenticated user for the current request as failed authorization. Thus, it tries to invoke the AccessDenied action so you could present the error to the user.

However, from our workflow it's not an error and we expect the user to be authenticated before she can edit her profile.

You solve this we need to force the middleware to go with the same flow as it would when signing in users. This can be done with Microsoft.AspNetCore.Http.Features.Authentication.ChallengeBehavior enumeration however ChallengeResult currently doesn't provide a constructor that accepts it. So we'll have to write our own result:

internal class CustomChallengeResult : ChallengeResult
{
    private readonly ChallengeBehavior behavior;

    public CustomChallengeResult(string authenticationScheme, AuthenticationProperties properties, ChallengeBehavior behavior)
        : base(authenticationScheme, properties)
    {
        this.behavior = behavior;
    }
    public override async Task ExecuteResultAsync(ActionContext context)
    {
        if (context == null)
        {
            throw new ArgumentNullException(nameof(context));
        }

        var loggerFactory = context.HttpContext.RequestServices.GetRequiredService<ILoggerFactory>();
        var logger = loggerFactory.CreateLogger<CustomChallengeResult>();

        var authentication = context.HttpContext.Authentication;

        if (AuthenticationSchemes != null && AuthenticationSchemes.Count > 0)
        {
            logger.LogInformation("Executing CustomChallengeResult with authentication schemes: {0}.", AuthenticationSchemes.Aggregate((aggr, current) => $"{aggr}, {current}"));

            foreach (var scheme in AuthenticationSchemes)
            {
                await authentication.ChallengeAsync(scheme, Properties, behavior);
            }
        }
        else
        {
            logger.LogInformation("Executing CustomChallengeResult.");
            await authentication.ChallengeAsync(Properties);
        }
    }
}

Now make sure to specify ChallengeBehavior.Unauthorized when returning the result:

if (User.Identity.IsAuthenticated)
{
    return new CustomChallengeResult(
        AuthConstants.OpenIdConnectB2CAuthenticationScheme,
        new AuthenticationProperties(new Dictionary<string, string> { { AuthConstants.B2CPolicy, policies.EditProfilePolicy } })
        {
            RedirectUri = "/"
        }, ChallengeBehavior.Unauthorized);
}

This will successfully redirect the user to the profile editing page:

Azure AD B2C profile editing page

If the user hits 'Continue' she will be redirected back to the application with the regular authentication response containing state, nonce, authorization code and ID token (depending on the OpenID Connect flow).

But if the user hits 'Cancel' Azure AD B2C will return an error response, oops:

POST https://localhost:8686/signin-oidc-b2c HTTP/1.1
Content-Type: application/x-www-form-urlencoded

error=access_denied
&
error_description=AADB2C90091: The user has cancelled entering self-asserted information.
Correlation ID: 3ed683a1-d742-4f59-beb8-86bc22bb7196
Timestamp: 2017-01-30 12:15:15Z

This somewhat unexpected response from Azure AD makes the middleware fail the authentication process. And it's correct from the middleware's standpoint as there are no artifacts to validate.

To mitigate this we're going to have to intercept the response and prevent the middleware from raising an error:

private static IOpenIdConnectEvents CreateOpenIdConnectEventHandlers(B2CAuthenticationOptions authOptions, B2CPolicies policies)
{
    return new OpenIdConnectEvents
    {
        ...
        OnMessageReceived = context =>
        {
            if (!string.IsNullOrEmpty(context.ProtocolMessage.Error) &&
                !string.IsNullOrEmpty(context.ProtocolMessage.ErrorDescription) &&
                context.ProtocolMessage.ErrorDescription.StartsWith("AADB2C90091") &&
                context.Properties.Items[AuthConstants.B2CPolicy] == policies.EditProfilePolicy)
            {
                context.Ticket = new AuthenticationTicket(context.HttpContext.User, context.Properties, AuthConstants.OpenIdConnectB2CAuthenticationScheme);
                context.HandleResponse();
            }

            return Task.FromResult(0);
        }
    };
}

OnMessageReceived event allows us to examine all responses received from the identity provider and also abort further processing. In our case, we're interested in profile editing and we check the policy value that has been set AccountController and we look for the specific AADB2C90091 error.s

We reconstruct the authentication ticket from the current principal and we know we can do that as the profile editing flow is only enabled for authenticated users. context.HandleResponse() is what makes the middleware back off and return the successful authentication result with our ticket to AuthenticationManager.

Please have a look at the complete solution so all pieces come together.

ADAL distributed token cache in ASP.NET Core

$
0
0

Azure AD Authentication Library (ADAL) relies on its token cache for efficient token management. When you request an access token with AcquireTokenSilentAsync and there is a valid token in the cache you get it right away. Otherwise if there is a refresh token it's used to obtain a new access token from Azure AD. The new token is then written into the cache and returned to you.

The library itself supports all kinds of scenarios: from mobile and JavaScript clients to server side applications. It can be used to store tokens for a single user as well as for many users. If you look at the token cache key class you can see that tokens can be stored and queried by target resources and authorities in addition to clients (applications) and users.

You don't directly work with the cache key and the underlying dictionary. Instead, you properly construct the AuthenticationContext and pass other parameters such as client credentials, user and/or resource identifiers to various AcquireToken* methods.

By default, there is an in memory singleton cache which is good for quick testing but it doesn't work in real life scenarios. First, tokens have their lifetime and if your application gets restarted you lose them and the user will have to re-authenticate against Azure AD. Second, when you scale out you need to make the cache available to all instances of your application.

The way the cache supports external storage basically boils down to the following. You derive from TokenCache and provide handlers for BeforeAccess and AfterAccess events. These are not even events technically, you just provide a couple of delegates. BeforeAccess gets called every time ADAL wants to access the cache and this is where you get a chance to populate the cache from your external storage. AfterAccess is called at the end of AcquireToken* methods and you want to persist the cache if it has been modified which you can tell by examining the HasStateChanged property. Pretty straight forward.

Now, when you load or persist the cache, that includes the whole dictionary, not just individual items. You are provided with convenient Serialize and Deserialize methods so you don't have to worry about they structure of keys and values. Instead, you just persist byte arrays.

That means, in server side web applications you want to manage the cache by users.

You can choose whatever the external storage and data access technology. In ASP.NET Core it makes a whole bunch of sense to make use of IDistributedCache as you get SQL Server and Redis support out of the box.

Before we move to the implementation let's have a look at how the cache is normally going to be used in web applications. Let's say we do the authorization code grant and redeem the code like this:

public void Configure(IApplicationBuilder app,
    IOptions<AuthOptions> authOptions, IDistributedCache distributedCache)
{
    app.UseOpenIdConnectAuthentication(new OpenIdConnectOptions
    {
        ...

        Events = new OpenIdConnectEvents
        {
            OnAuthorizationCodeReceived = async context =>
            {
                var userId = context.Ticket.Principal.FindFirst(AuthConstants.ObjectId).Value;

                var clientCredential = new ClientCredential(authOptions.Value.ClientId, authOptions.Value.ClientSecret);
                var authenticationContext = new AuthenticationContext(authOptions.Value.Authority,
                    new DistributedTokenCache(distributedCache, userId));

                await authenticationContext.AcquireTokenByAuthorizationCodeAsync(context.TokenEndpointRequest.Code,
                    new Uri(context.TokenEndpointRequest.RedirectUri, UriKind.RelativeOrAbsolute),
                    clientCredential, authOptions.Value.ApiResource);

                context.HandleCodeRedemption();
            }
        }
    });
}

We pass a new instance of our DistributedTokenCache to the AuthenticationContext and we bind to the signed in user. We can get the unique identifier of the user from the http://schemas.microsoft.com/identity/claims/objectidentifier claim that we get in the ID token from Azure AD.

When it's time to call a protected API we request an access from ADAL. You may want to write something like a token provider component like this:

internal class AccessTokenProvider : IAccessTokenProvider
{
    private readonly AuthOptions authOptions;
    private readonly IHttpContextAccessor httpContextAccessor;
    private readonly IDistributedCache distributedCache;

    public AccessTokenProvider(IOptions<AuthOptions> authOptions,
        IHttpContextAccessor httpContextAccessor,
        IDistributedCache distributedCache)
    {
        this.authOptions = authOptions.Value;
        this.httpContextAccessor = httpContextAccessor;
        this.distributedCache = distributedCache;
    }

    public async Task<string> AcquireTokenAsync(string resource)
    {
        var userId = httpContextAccessor.HttpContext.User.FindFirst(AuthConstants.ObjectId).Value;

        var clientCredential = new ClientCredential(authOptions.ClientId, authOptions.ClientSecret);
        var authenticationContext = new AuthenticationContext(authOptions.Authority,
            new DistributedTokenCache(distributedCache, userId));

        try
        {
            var authenticationResult = await authenticationContext.AcquireTokenSilentAsync(resource,
                clientCredential, new UserIdentifier(userId, UserIdentifierType.UniqueId));

            return authenticationResult.AccessToken;
        }
        catch (AdalSilentTokenAcquisitionException ex)
        {
            // handle it
            return null;
        }
    }
}

Again, we pass a fresh instance of the cache to the AuthenticationContext. You may find other examples of the token cache implementation on the internet and often they sort of assume that the cache instance is re-used but my implementation is based on the assumption that you create a new instance every time you need it which makes sense in stateless web applications.

With all of the above, let's get down to implementing our distributed token cache.

internal class DistributedTokenCache : TokenCache
{
    private readonly IDistributedCache cache;
    private readonly string userId;

    public DistributedTokenCache(IDistributedCache cache, string userId)
    {
        this.cache = cache;
        this.userId = userId;

        BeforeAccess = OnBeforeAccess;
        AfterAccess = OnAfterAccess;
    }

    private void OnBeforeAccess(TokenCacheNotificationArgs args)
    {
        var userTokenCachePayload = cache.Get(CacheKey);
        if (userTokenCachePayload != null)
        {
            Deserialize(userTokenCachePayload);
        }
    }

    private void OnAfterAccess(TokenCacheNotificationArgs args)
    {
        if (HasStateChanged)
        {
            var cacheOptions = new DistributedCacheEntryOptions
            {
                AbsoluteExpirationRelativeToNow = TimeSpan.FromDays(14)
            };

            cache.Set(CacheKey, Serialize(), cacheOptions);

            HasStateChanged = false;
        }
    }

    private string CacheKey => $"TokenCache_{userId}";
}

Pretty straight forward. We set the expiration to 14 days which is the default life time of refresh tokens issued by Azure AD. But be aware that it may not always be the case.

Sometimes you can see examples that also override Clear and DeleteItem methods but it's not required in our case. We always get the AfterAccess notification when those methods finish and as our cache is scoped to a single user we want to make sure to persist the whole thing if it has been changed.

Implementing a REST client for internal communication in Service Fabric

$
0
0

In this post we're going to look at specifics of building a REST client for service to service communication within a Service Fabric cluster. We're going to discuss endpoint resolution and communication components provided by Service Fabric and how we can use them with AutoRest generated clients and ADAL.

Internal communication basics

Service Fabric cluster manager takes care of spreading service instances and replicas across cluster nodes and relocating them as needed. From the internal communication standpoint the most important thing to remember is that a service endpoint is not permanent and may change at any moment. Your service may get shut down when it's unresponsive or the node it's running on is getting updated. The service may get moved to another node for more efficient utilization of the cluster resources as determined by Service Fabric.

Every time you register a listener you return the actual endpoint address from ICommunicationListener.OpenAsync method that gets registered with the naming service running in the cluster. For a consuming service to call your service it requires the following steps to be carried out:

  1. Call the naming service with a canonical Uri of the target service in order to get an actual address that can be used to make a call.
  2. Try to call the service using the returned address.
  3. Handle possible errors and decide whether we need to repeat steps 1-3 as the target service may have been moved to another node by the time we tried to reach it. Also, implementing Retry and Circuit Breaker patterns are going to help mitigate transient errors and avoid bombarding services that are experiencing issues.

Internal communication in Service Fabric

Service Fabric provides components that help you communicate with the naming service. First of all, it's FabricClient which is central component for communication with Service Fabric infrastructure. It implements internal optimizations such as caching and it's highly recommended to share and re-use a FabricClient instance within your service.

Another component is ServicePartitionResolver that relies on FabricClient and can be used to obtain an actual endpoint address given a canonical service Uri within a partition.

Endpoint resolution procedure can be sketched like this:

ServicePartitionResolver resolver = ServicePartitionResolver.GetDefault();
ResolvedServicePartition partition =
    await resolver.ResolveAsync("fabric:/BookFast/FacilityService", new ServicePartitionKey(), cancellationToken);

ResolvedServiceEndpoint endpoint = partition.GetEndpoint();

JObject addresses = JObject.Parse(endpoint.Address);
string address = (string)addresses["Endpoints"].First();

Here we use a singleton instance of ServicePartitionResolver that takes care of instantiating FabricClient. We try to resolve a current address of BookFast facility service by its canonical Uri fabric:/BookFast/FacilityService using a singleton partition. Normally, you don't partition stateless services and this is exactly the case with the facility service.

partition.GetEndpoint() is going to return an address of a random instance of your stateless service. Then all that's left is some parsing trivia.

Unlike stateless services, stateful services often require partitioning as this is the way they scale out. So if you're communicating with a stateful service you need to provide a valid partition key (based on the agreed partitioning schema) and expect partition.GetEndpoint() to return an endpoint of the primary replica which is the replica you want to communicate to as it has read and write access to the service state.

Getting retry support with ServicePartitionClient

Service Fabric also provides you with a higher level communication component called ServicePartitionClient which handles endpoint resolution under the hood and gives you two things on top of that:

  1. It caches resolved endpoints which improves efficiency as you don't have to call the naming service every time you want to call a service which endpoint has already been resolved. ServicePartitionClient will re-trigger endpoint resolution if the endpoint turns out to be stale.
  2. It implements the Retry pattern which is a recommended practice to mitigate self healing (aka transient) errors.

There are a few more classes involved when working with ServicePartitionClient. First of all, it's communication client factory that performs most of the work by communicating with the naming service using ServicePartitionResolver and caching resolved endpoints. As the cache is maintained within an instance of the factory you want to re-use it between your calls to other services. That means, you normally want to go with a singleton instance of the factory.

Now, it's called a factory because its purpose is to create instances of communication clients. Think of a communication client as a wrapper around a resolved endpoint that implements ICommunicationClient interface. In your consuming services you create factories by deriving from CommunicationClientFactoryBase and implementing its methods such as CreateClientAsync.

Finally, you need a way to tell ServicePartitionClient how to handle errors and whether it should retry a call or resolve a new endpoint address. You do that by implementing IExceptionHandler. Service Fabric samples give an example of a possible implementation of the interface. In fact, you want to check out this particular WordCount sample to get an idea of how all these components fit together.

Common infrastructure classes and AutoRest

I've already blogged about using AutoRest to generate clients against Swagger documentation provided by RESTful services. I recommend this approach (or any alternative such as swagger-codegen) as it removes grinding chore of writing ceremony code around HttpClient.

AutoRest generates representations (models), the actual wrapper around HttpClient and the interface that this wrapper implements. Now, to be realistic, you normally build additional proxy components on top of this generated code as you have to at least handle HTTP error responses and perform additional mapping.

Here's what your proxy might look like:

internal class FacilityProxy : IFacilityProxy
{
    private readonly IFacilityMapper mapper;
    private readonly IBookFastFacilityAPI api;

    public FacilityProxy(IFacilityMapper mapper,
        IBookFastFacilityAPI api)
    {
        this.mapper = mapper;
        this.api = api;
    }

    public async Task<Contracts.Models.Facility> FindAsync(Guid facilityId)
    {
        var result = await api.FindFacilityWithHttpMessagesAsync(facilityId);

        if (result.Response.StatusCode == HttpStatusCode.NotFound)
        {
            throw new FacilityNotFoundException(facilityId);
        }

        return mapper.MapFrom(result.Body);
    }
}

IBookFastFacilityAPI is the generated interface and the rest is our usual proxy code. We would like to use the proxy in Service Fabric and take advantage of its communication components described above.

First, let's create a communication client that represents a resolved endpoint:

public class CommunicationClient<T> : ICommunicationClient
{
    private readonly Func<Task<T>> apiFactory;

    public CommunicationClient(Func<Task<T>> apiFactory)
    {
        this.apiFactory = apiFactory;
    }

    public Task<T> CreateApiClient() => apiFactory();

    ResolvedServiceEndpoint ICommunicationClient.Endpoint { get; set; }
    string ICommunicationClient.ListenerName { get; set; }
    ResolvedServicePartition ICommunicationClient.ResolvedServicePartition { get; set; }
}

We're not that interested in ICommunicationClient interface itself. Rather we want to get a hold of the factory method that creates an instance of the AutoRest generated client. T represents a particular client type, such as IBookFastFacilityAPI.

You may wonder why we need this factory method but hold on a minute, I'll get back to it soon.

Let's also define a factory interface to be used in our proxy to create a ServicePartitionClient:

public interface IPartitionClientFactory<TCommunicationClient> where TCommunicationClient : ICommunicationClient
{
    ServicePartitionClient<TCommunicationClient> CreatePartitionClient();
    ServicePartitionClient<TCommunicationClient> CreatePartitionClient(ServicePartitionKey partitionKey);
}

The second overload accepting ServicePartitionKey is useful for stateful services.

Now our proxy code can be rewritten like this:

internal class FacilityProxy : IFacilityService
{
    private readonly IFacilityMapper mapper;
    private readonly IPartitionClientFactory<CommunicationClient<IBookFastFacilityAPI>> factory;

    public FacilityProxy(IFacilityMapper mapper,
        IPartitionClientFactory<CommunicationClient<IBookFastFacilityAPI>> factory)
    {
        this.mapper = mapper;
        this.factory = factory;
    }

    public async Task<Contracts.Models.Facility> FindAsync(Guid facilityId)
    {
        var result = await factory.CreatePartitionClient()
            .InvokeWithRetryAsync(async client =>
            {
                var api = await client.CreateApiClient();
                return await api.FindFacilityWithHttpMessagesAsync(facilityId);
            });

        if (result.Response.StatusCode == HttpStatusCode.NotFound)
        {
            throw new FacilityNotFoundException(facilityId);
        }

        return mapper.MapFrom(result.Body);
    }
}

Now we have endpoint resolution, caching and retry and we still use the AutoRest generated client. Sweet!

Implementing a service client

Often teams responsible for particular services provide client libraries for consumers of their services. Let's see how such a library can be implemented for the facility service.

The library apparently will incorporate the AutoRest generated code together with the implementation of IPartitionClientFactory and required components.

The central component is the communication client factory:

internal class FacilityCommunicationClientFactory :
    CommunicationClientFactoryBase<CommunicationClient<IBookFastFacilityAPI>>
{
    public FacilityCommunicationClientFactory(IServicePartitionResolver resolver)
        : base(resolver, new[] { new HttpExceptionHandler() })
    {
    }

    protected override Task<CommunicationClient<IBookFastFacilityAPI>> CreateClientAsync(string endpoint, CancellationToken cancellationToken)
    {
        var client = new CommunicationClient<IBookFastFacilityAPI>(
            () => Task.FromResult<IBookFastFacilityAPI>(new BookFastFacilityAPI(new Uri(endpoint))));

        return Task.FromResult(client);
    }
}

I omitted other methods' implementations as they are trivial for HTTP clients.

Now it's time to explain this delegate dance when instantiating BookFastFacilityAPI. I was migrating the facility service from a stand alone public facing service which required an access token issued by Azure AD. I did not want to change internals of the service which rely on the token so I had to have an opportunity to execute code before each call to the service. You got it, in this case this code is about getting or refreshing the access token. Here's the updated implementation of the factory:

internal class FacilityCommunicationClientFactory :
    CommunicationClientFactoryBase<CommunicationClient<IBookFastFacilityAPI>>
{
    private readonly IAccessTokenProvider accessTokenProvider;
    private readonly ApiOptions apiOptions;

    public FacilityCommunicationClientFactory(IServicePartitionResolver resolver,
        IAccessTokenProvider accessTokenProvider,
        IOptions<ApiOptions> apiOptions)
        : base(resolver, new[] { new HttpExceptionHandler() })
    {
        if (accessTokenProvider == null)
        {
            throw new ArgumentNullException(nameof(accessTokenProvider));
        }

        this.accessTokenProvider = accessTokenProvider;
        this.apiOptions = apiOptions.Value;
    }

    protected override Task<CommunicationClient<IBookFastFacilityAPI>> CreateClientAsync(string endpoint, CancellationToken cancellationToken)
    {
        var client = new CommunicationClient<IBookFastFacilityAPI>(async () =>
        {
            var accessToken = await accessTokenProvider.AcquireTokenAsync(apiOptions.ServiceApiResource);
            var credentials = string.IsNullOrEmpty(accessToken)
                              ? (ServiceClientCredentials)new EmptyCredentials()
                              : new TokenCredentials(accessToken);

            return new BookFastFacilityAPI(new Uri(endpoint), credentials);
        });

        return Task.FromResult(client);
    }
}

Remember that communication clients get cached and we want to make sure to check and refresh access tokens if they happen to get stale. I rely on ADAL with its internal token cache and refresh logic to handle tokens. I've recently blogged about ADAL's cache and the possible implementation of the access token provider.

We are talking about internal communication and you may have a valid question why we need tokens when communicating to internal services. Often you need to create a security context for the call and I agree that with internal services going full OAuth2 is an overkill. Even if an internal service is also exposed to the outside world we may choose to implement separate endpoints for internal and external communication. But in this case it was a migration of a stand alone service which already relied on JWT tokens to construct a security context. It's a viable approach when you're not ready to change the internals of the service.

The implementation of IPartitionClientFactory is straight forward:

internal class FacilityPartitionClientFactory :
    IPartitionClientFactory<CommunicationClient<IBookFastFacilityAPI>>
{
    private readonly ICommunicationClientFactory<CommunicationClient<IBookFastFacilityAPI>> factory;
    private readonly ApiOptions apiOptions;

    public FacilityPartitionClientFactory(ICommunicationClientFactory<CommunicationClient<IBookFastFacilityAPI>> factory,
        IOptions<ApiOptions> apiOptions)
    {
        this.factory = factory;
        this.apiOptions = apiOptions.Value;
    }

    public ServicePartitionClient<CommunicationClient<IBookFastFacilityAPI>> CreatePartitionClient() =>
        new ServicePartitionClient<CommunicationClient<IBookFastFacilityAPI>>(factory, new Uri(apiOptions.ServiceUri));

    public ServicePartitionClient<CommunicationClient<IBookFastFacilityAPI>> CreatePartitionClient(ServicePartitionKey partitionKey) =>
        new ServicePartitionClient<CommunicationClient<IBookFastFacilityAPI>>(factory, new Uri(apiOptions.ServiceUri), partitionKey);
}

We expect the canonical address of the facility service to be specified in the consuming service configuration. We also need to implement registration of our components in the DI container of the consuming service:

public class CompositionModule : ICompositionModule
{
    public void AddServices(IServiceCollection services, IConfiguration configuration)
    {
        services.Configure<ApiOptions>(configuration.GetSection("FacilityApi"));

        services.AddSingleton(new FabricClient());

        services.AddSingleton<ICommunicationClientFactory<CommunicationClient<IBookFastFacilityAPI>>>(
            serviceProvider => new FacilityCommunicationClientFactory(
                new ServicePartitionResolver(() => serviceProvider.GetService<FabricClient>()),
                serviceProvider.GetService<IAccessTokenProvider>(),
                serviceProvider.GetService<IOptions<ApiOptions>>()));

        services.AddSingleton<IPartitionClientFactory<CommunicationClient<IBookFastFacilityAPI>>, FacilityPartitionClientFactory>();
    }
}

We want to go with a single instance of the communication client factory to take advantage of its cache.

Microservices primer with Azure Service Fabric

$
0
0

Not so long ago I've written a post about motivation for transforming traditional monolithic architectures into microservices. I've touched upon key characteristics of microservices and things to look out for when building them. Today I want to do a more hands-on post on turning an existing application into a microservices application.

Existing solution

I'm going to use my playground solution called BookFast that I often use to try out things and demonstrate concepts that I write about on this blog.

Existing BookFast solution

It's an ASP.NET Core application that allows organizations to provide their facilities and accommodations to be booked by customers. The application features MVC based UI and provides RESTful API that enables other clients to communicate with it. It relies on a bunch of Azure services such as SQL databases and storage, Azure AD for organizational accounts and Azure AD B2C for customer authentication, Azure Search, Application Insights, etc.

Although it's split by a pure technical separation of concerns (UI, API, etc) which enables independent scalability of these components, the individual components are essentially monoliths. You can't add or update a feature without redeploying the whole thing, you can't scale features independently, features start having interdependencies which make the solution rigid to change over time.

Enter microservices

When identifying service boundaries for our future microservices first of all we look at business capabilities provided by the application. In BookFast we can define the following basic scenarios:

  1. As a facility provider I need to manage facilities and accommodations provided by my organization.
  2. As a facility provider I want to upload and remove images of my facilities and accommodations.
  3. As a customer I want to be able to search for accommodations.
  4. As a customer I want to be able to book an accommodation.

Besides business services, as we develop our microservices application we naturally start seeing new services with a pure technical purpose such as indexers, synchronizers, registers, etc. But it's important to start with business capabilities.

BookFast microservices

With microservices we greatly increase complexity of our system but it should not scare us away because at the same time we solve the most important problem - being able to evolve our system fast in response to the constant stream of changes coming from customers, stakeholders and so on.

We need to think about service deployment, updates, health monitoring, resilience to failures and operating system updates. In other words we need an infrastructure to handle all that and various container orchestration tools deliver this exact functionality. Microsoft has built its own microservices platform called Service Fabric that it uses to run their own production services and has made it available for everyone. You can run Service Fabric cluster in Azure, other cloud or on premises.

Service Fabric gives you programming models on top of cluster management. As we migrate existing applications chances are they have been built stateless which is exactly the case with BookFast. This makes Service Fabric stateless services a perfect fit for us. Service Fabric services (both stateless and tasteful) allow you to open up network listeners as well as run background tasks. This should suffice to cover all of our scenarios.

You can check out a complete re-architectured application here. In the following sections I'm going to describe the anatomy of a microservice and give some tips on various aspects of their implementation.

Microservice internals

Do not be misled by the word micro - your microservice still deserves a solid architecture with proper layers and dependency discipline. If you look at any of the BookFast microservices you will find that it normally consists of a few projects:

Microservice projects

There is a host project (e.g. BookFast.Facility) which:

  1. Serves as a host for Service Fabric service instances;
  2. Implements REST API for the service. So it also serves as a front-end project.

When a service instance is created it is asked to provide a collection of endpoint listeners through overridden CreateServiceInstanceListeners methods. Details depend on your stack of choice. BookFast is based on ASP.NET Core and thus we build our IWebHost and wrap it with one of the communication listeners provided by Microsoft.ServiceFabric.AspNetCore.Kestrel and Microsoft.ServiceFabric.AspNetCore.WebListener packages. Some services (e.g. search indexer) implement background processing and subscribe to triggers (e.g. a queue) in the overridden RunAsync method.

There is a contracts project defining service domain model and business interfaces. These are not external contracts but the internal model of the service. There are also business and data projects implementing appropriate layers.

Microservice components

Services rely on versioned configuration packages and per-environment configuration supported by Service Fabric. I've written a couple of posts on how you can integrate configuration packages with ASP.NET Core configuration and how to override code package's environment variables.

Integration

There are a few patterns for service to service communication:

  • Request-response (RPC style or REST)
  • Duplex over a persistent connection
  • Asynchronous through a broker (e.g. a queue)

BookFast mostly relies on request-response through RESTful services. Even though its APIs provide Swagger documentation and enable consumers (in our case there is a single consumer but anyway) to generate clients for them it's considered a good practice for teams owning microservices to provide client libraries for them, often for various platforms and languages. It makes it easier to use the service and helps insure that the service and client libraries stay in sync as the service evolves.

With microservices managed in a cluster there is one more task to accomplish before we can communicate with a service - discovery. Services can be moved around a cluster in response to node upgrades or failures, resource usage optimization and so on. Even though Service Fabric provides us with a naming service and convenient client side components for service discovery writing this boilerplate code can be rather tedious.

I've given details on implementing a client library for internal communication in Service Fabric in this post. All BookFast services follow this approach.

Common components

You should be careful with shared or common components as they can easily introduce either coupling between services or dependencies between teams managing different services. Limit them to infrastructural code or cross cutting concerns if you haven't decided to move them to services on their own. Never share business logic. If you find that you need to do so step back and reconsider your use cases and service boundaries. You are likely to discover new services.

There are a handful of infrastructural common components in BookFast:

Common components

  • BookFast.Framework - defines common infrastructure interfaces such as ICompositionModule, etc.
  • BookFast.Rest - helps integrate access token retrieval with AutoRest generated clients.
  • BookFast.Security - defines application roles and claim types together with ISecurityContext interface that allows business services to make appropriate decisions based on the current user or tenant.
  • BookFast.Security.AspNetCore - contains ASP.NET Core specific implementation of ISecurityContext.
  • BookFast.ServiceFabric - implements common configuration and communication infrastructure specific to Service Fabric, it also defines provides service instance and replica factories.
  • BookFast.Swagger - implements Swashbuckle configuration.

Restructuring web applications into features

This is not strictly related to microservices but I would like to talk about the way we organize web applications a little bit and how we can make it better. When you start a new MVC project you are given the familiar Controllers, Views and Models directories. You start adding stuff and end up with a few dozens of controllers sitting in a single directory, hundreds of models often in one or several directories. The framework somewhat helps organize views with default conventions but navigating a relatively complex application stops being fun way too soon.

Effectively we end up with an application with unclear feature boundaries. It may or may not impact maintainability of the application depending on the maturity level of the team and practices that have been followed. But I think if we applied a similar vertical slicing to the web application as we did to the rest of the system with microservices we would end up with a better organized application. Instead of mechanically splitting components based on their purpose we could split them by features. Each feature would have its controllers, models and views.

Web app features

I highly recommend you check out this article on the topic. BookFast uses this approach and relies on OdeToCode.AddFeatureFolders package to configure the view engine to support new conventions.

Service Fabric stateful services

$
0
0
Service Fabric stateful services

Service Fabric is a great compute platform for your applications. But did you know it is also a storage platform? Stateful services programming model enables this capability. Stateful services allow you to persist data right on the same nodes where your services are executing. This allows you to greatly reduce back pressure on your external storage as unlike with stateless services you don't have to restore context and state by making network requests to external storage systems.

The state is persisted in so called reliable collections. They are called reliable as the state is replicated across replicas and you have transaction support when accessing and modifying it. There are two flavors of reliable collections available for you: dictionaries and queues.

Availability

High availability of the state persisted within stateful services is achieved with replicas. Each replica is an instance of your stateful services that contains a copy of the service state. There is a primary replica that can be used for read and write operations and this is the only replica that can be used for write operations.

Changes to state from write operations are replicated to secondary replicas. The secondary replicas are called active secondary because they also support read operations. By default, only the primary replica will open up the endpoint. You need to opt in by setting listenOnSecondary flag when creating a communication listener.

When the primary replica goes down Service Fabric chooses one of the secondary replicas and promotes it to primary. At the same time the infrastructure is taking care of provisioning the lost replica on another node.

Scalability

Scalability of stateful services is achieved with partitions. Contrast this to stateless services where both scalability and availability is achieved with additional service instances. In stateful services adding additional replicas won't be enough as you still communicate with a single primary replica for read/write operations.

By partitioning your state horizontally you marshal requests to partitions that contain data related to these requests. Each partition consists of a replica set with a single primary replica and multiple active secondary replicas. In other words, you have the same state replication as described above with a single partition. Service Fabric makes sure to distribute replicas of partitions across nodes so that secondary replicas of a partition do not end up on the same node as the primary replica.

Service Fabric stateful services

In order to call an endpoint of a particular partition you need to resolve its current address within the cluster. I've already touched upon endpoint resolution process before so might want to check out that post. You normally use infrastructure client components such as ServicePartitionResolver or a more sophisticated ServicePartitionClient to do the job and you need to pass a ServicePartitionKey to them to identify the partition.

Now it becomes obvious that you need a consistent way to create partition keys otherwise you won't be able to access data. There can be many approaches to accomplish that and I will describe one later in this post. But before we move on to a practical example I would like to mention another aspect of communication with stateful services.

Partitioning strategy that you choose for services is an implementation detail. You should not expose it to external callers because a) they are going to have to jump through the endpoint resolution hoops and you're going to have to expose internal cluster services as well; and b) even though it's complicated to change the strategy after the fact, you still may want to do so by introducing a new service or making a more drastic change to your application. Instead, external service should call your application through well known stable public endpoints.

Normally you would expose stateless services in front of your internal stateful services. The stateless services play the role of façade for the stateful ones. They can scale independently and will take care of endpoint resolution and calling the appropriate partitions of your stateful services.

Service Fabric stateful services

You may also define different node types in your cluster. It allows you to have machines of different size and set placement rules for the cluster manager. Moreover, if you set instance count for your stateless façade services to -1 it will make the cluster manager deploy one instance to each machine with respect to placement rules. You can easily scale the façade by adding more nodes of the appropriate type to the cluster.

Example of a stateful service

In the microservice primer post I've described a sample solution called BookFast that allows organizations to provide facilities and accommodations for rental and customers to book them through the system. One of the core services of the solution is the actual booking service.

The booking service is responsible for accepting new booking requests, keeping track of bookings made and availability of accommodations. Given the anticipated massive load of requests from all over the globe it makes this service a perfect candidate to be turned into a stateful one. We can spread facilities over multiple partitions and have the façade stateless service (which in this case is an MVC web app) dispatch booking requests to target partitions depending on the facility the requests are made for.

Service Fabric stateful services

Facilities are identified with Guids and I've used a simple partitioning scheme where a partition is determined by the first character of the Guid string representation. This gives us 16 partitions (0-9, A-F) and we can implement a common helper method to calculate the partition number:

public static long ToPartitionKey(this Guid id)
{
    var first = id.ToString().ToUpperInvariant().First();
    var offset = first - '0';
    if (offset <= 9)
    {
        return offset;
    }

    return first - 'A' + 10;
}

Here's an example of a proxy operation of the stateless façade that registers a booking request:

public async Task BookAsync(Guid facilityId, Guid accommodationId, BookingDetails details)
{
    var data = mapper.MapFrom(details);
    data.AccommodationId = accommodationId;

    var result = await partitionClientFactory.CreatePartitionClient(new ServicePartitionKey(facilityId.ToPartitionKey())).InvokeWithRetryAsync(async client =>
    {
        var api = await client.CreateApiClient();
        return await api.CreateBookingWithHttpMessagesAsync(accommodationId, data);
    });

    if (result.Response.StatusCode == HttpStatusCode.NotFound)
    {
        throw new AccommodationNotFoundException(accommodationId);
    }
}

Often your stateful services will require external data. For instance, the booking services needs details of facilities and accommodations and this data is managed by another service (FacilityService). Now we have an issue! We've worked so hard to keep data together with stateful services so that we don't have to pay the price of external calls and now we seem to still have to make these calls upon each request! This does not eliminate benefits of storing the primary state locally but still is something to watch out for.

We have a few options to reduce the impact of extern calls from stateful services:

  1. Caching. A straight forward and quite efficient option in most cases. Our sample booking service relies on Redis to cache facility and accommodation details it retrieves from the facility service.
  2. Data sync. We can implement a synchronization process (either as a separate stateless service or within the stateful service itself) that would pull the data from external sources periodically and store it in appropriate partitions of the stateful service.
  3. We can make service managing catalog data push it to stateful services using this data. If we don't want to introduce additional coupling we could implement an asynchronous push over a queue.

Service Fabric application lifecycle management using PowerShell

$
0
0

This post is a collection of notes that I took as I was familiarizing myself with lifecycle management of Service Fabric applications. As I was going through the process I learned more about versioning and packaging, deployment and upgrade scenarios. Oh, and by the way I've found the official documentation pretty helpful.

Connect to cluster

It all starts with establishing a connection to your cluster. We use a client connection endpoint (port 19000) for this. I've protected my cluster with Azure AD and thus I need to specify -AzureActiveDirectory flag when calling Connect-ServiceFabricCluster:

Connect-ServiceFabricCluster -ConnectionEndpoint 'dzimchuk.westeurope.cloudapp.azure.com:19000' -AzureActiveDirectory -ServerCertThumbprint '<thumbprint value>'

If you use a client certificate there are appropriate parameters allowing the cmdlet to look it up. -ServerCertThumbprint is used to verify if we are connecting to the correct cluster.

Upload application package to image store

The application package is created during the build process and is basically a directory structure containing an application manifest and service directories, each containing a service manifest and additional folders for code, config and data packages. As of SDK 2.5 release there is a new switch on Copy-ServiceFabricApplicationPackage cmdlet called -CompressPackage which enables in place compression of service packages and allows you to save bandwidth and time.

Copy-ServiceFabricApplicationPackage -ApplicationPackagePath '<path to package>' -ImageStoreConnectionString fabric:ImageStore -ApplicationPackagePathInImageStore BookFast100 -CompressPackage

The image store runs as a separate service inside your cluster (except for one box scenario). You have to provide a connection string to it which is by default configured as fabric:ImageStore. You should also provide a path in the image store to be used for this particular version of the package. You're going to need to specify this path later when registering an application type. You may want to come up with a convention where the path corresponds to the application package version.

Register application type

Once your package is in the image store it's time to register it as a separate version application type.

Register-ServiceFabricApplicationType -ApplicationPathInImageStore BookFast100

Register-ServiceFabricApplicationType verifies the package and uploads it to the internal location. Only when the verification succeeds will you be able to create or upgrade applications with the new package.

It may take longer than the default timeout of 60 seconds to register an application type of a large application. You can specify a timeout with -TimeoutSec parameter or you may choose to run the command asynchronously with Async flag. You can check the status of the asynchronous operation with Get-ServiceFabricApplicationType cmdlet.

Create new application

New-ServiceFabricApplication cmdlet creates an application of a registered application type. When an application is created all services defined as default services in the application manifest get created as well. Services can also be individually created as part of the specified running application with New-ServiceFabricService cmdlet.

$ParametersXml = ([xml] (Get-Content '<path>\Cloud.xml')).Application.Parameters

$parameters = @{}
$ParametersXml.ChildNodes | foreach {
       if ($_.LocalName -eq 'Parameter') {
           $parameters[$_.Name] = $_.Value
       }
    }

New-ServiceFabricApplication -ApplicationName fabric:/BookFast -ApplicationTypeName BookFastType -ApplicationTypeVersion 1.0.0 -ApplicationParameter $parameters

Service Fabric supports per environment configuration and we can pass a hashtable of environment specific parameters to New-ServiceFabricApplication cmdlet. In the example above we construct the hashtable by parsing the cloud environment parameters file which gets added by the default Visual Studio template. The actual parameters must be defined in the application manifest.

Alternative scripts

I'd like to make a side note here that Visual Studio relies on a separate collection of PowerShell scripts when working with Service Fabric. These scripts can be found in 'c:\Program Files\Microsoft SDKs\Service Fabric\Tools\PSModule\ServiceFabricSDK' folder and are supposed to be used with Visual Studio tooling. There are script like Publish-NewServiceFabricApplication or Publish-UpgradedServiceFabricApplication that accept a per environment configuration file.

Visual Studio even gives you a higher level universal script Deploy-FabricApplication.ps1 that supports publish profiles which are also added by the default solution template.

These scripts provide a somewhat more convenient API from the tooling perspective. They ultimately rely on the Service Fabric PowerShell module.

Upgrade application

Before you can upgrade your application you need to upload a new version of the application package to a new location in the image store:

Copy-ServiceFabricApplicationPackage -ApplicationPackagePath '<path to package>' -ImageStoreConnectionString fabric:ImageStore -ApplicationPackagePathInImageStore BookFast101 -CompressPackage

The new package should have appropriate service manifests and the application manifest versions updated. In other words, if you change any package of any service the affected services' manifests should reflect the new package versions and have their own manifest versions updated.

For example, if I update a configuration package of the Booking service to version 1.0.1. I should also update the service manifest version:

<ServiceManifest Name="BookFast.BookingPkg"
                 Version="1.0.1"
                 xmlns="http://schemas.microsoft.com/2011/01/fabric"
                 xmlns:xsd="http://www.w3.org/2001/XMLSchema"
                 xmlns:xsi="http://www.w3.org/2001/XMLSchema-instance">
  <ServiceTypes>
    <StatefulServiceType ServiceTypeName="BookingServiceType" HasPersistedState="true" />
  </ServiceTypes>

  <CodePackage Name="Code" Version="1.0.0">
    ...
  </CodePackage>

  <ConfigPackage Name="Config" Version="1.0.1" />

</ServiceManifest>

Now because the service manifest has changed I need to import the new version in the application manifest and also update its version:

<ApplicationManifest xmlns:xsd="http://www.w3.org/2001/XMLSchema" xmlns:xsi="http://www.w3.org/2001/XMLSchema-instance" ApplicationTypeName="BookFastType" ApplicationTypeVersion="1.0.1" xmlns="http://schemas.microsoft.com/2011/01/fabric">

  <ServiceManifestImport>
    <ServiceManifestRef ServiceManifestName="BookFast.BookingPkg" ServiceManifestVersion="1.0.1" />
    ...
  </ServiceManifestImport>

</ApplicationManifest>

Then you register the new package with Register-ServiceFabricApplicationType cmdlet. It verifies the content of every package of every service and compares it to the already registered versions of the same packages. Now, if I rebuilt the whole application package from scratch I'm going to run into the following error:

Register-ServiceFabricApplicationType -ApplicationPathInImageStore BookFast101

Register-ServiceFabricApplicationType : The content in CodePackage Name:Code and Version:1.0.0 in Service Manifest 'BookFast.BookingPkg' has changed, but the version number is the same.

Even though I haven't touched the code package its binary content has changed. Thus I should either make sure to provide the same built artifacts for the unchanged packages or I can upload a diff package.

A diff application package is the same directory structure as a full package however it only contains modified packages together with appropriate updated service manifests and the update application manifest. Any reference in the application manifest or service manifests that can't be found in the diff package is searched for in the image store.

Note that as of the time of this writing there was an issue when diff packages were used to upgrade applications deployed with compressed full packages:

Register-ServiceFabricApplicationType : The Image Builder encountered an unexpected error.

Hopefully it will be addressed soon.

Now we have 2 application types registered in the cluster and the currently active application created from version 1.0.0:

Two registered application types

If we dig down on the details of version 1.0.1 type we're going to see the expected hierarchy of package and manifest versions:

Hierarchy of package and manifest versions

Now we're ready to start a monitored rolling upgrade of the application.

Start-ServiceFabricApplicationUpgrade -ApplicationName fabric:/BookFast -ApplicationTypeVersion 1.0.1 -HealthCheckStableDurationSec 60 -UpgradeDomainTimeoutSec 1200 -UpgradeTimeoutSec 3000 -FailureAction Rollback -Monitored

Start-ServiceFabricApplicationUpgrade also allows you to provide a new set of environment specific parameters if needed.

The upgrade is performed one upgrade domain at a time. Service Fabric performs health checks before moving to the next upgrade domain. We also chose to roll back to the previous version of the application if the upgrade fails at any point. Most of the upgrade parameters and timeouts are configurable. You can get more details on upgrade parameters here.

Rolling upgrade

The status of the rolling upgrade can also be monitored with PowerShell:

Get-ServiceFabricApplicationUpgrade -ApplicationName fabric:/BookFast


ApplicationName                         : fabric:/BookFast
ApplicationTypeName                     : BookFastType
TargetApplicationTypeVersion            : 1.0.1
ApplicationParameters                   : {}
StartTimestampUtc                       : 4/5/2017 11:08:35 AM
UpgradeState                            : RollingForwardInProgress
UpgradeDuration                         : 00:02:00
CurrentUpgradeDomainDuration            : 00:00:00
NextUpgradeDomain                       : 2
UpgradeDomainsStatus                    : { "1" = "InProgress";
                                          "0" = "Completed";
                                          "2" = "Pending" }
UpgradeKind                             : Rolling
RollingUpgradeMode                      : Monitored
FailureAction                           : Rollback
ForceRestart                            : False
UpgradeReplicaSetCheckTimeout           : 49710.06:28:15
HealthCheckWaitDuration                 : 00:00:00
HealthCheckStableDuration               : 00:01:00
HealthCheckRetryTimeout                 : 00:10:00
UpgradeDomainTimeout                    : 00:20:00
UpgradeTimeout                          : 00:50:00
ConsiderWarningAsError                  :
MaxPercentUnhealthyPartitionsPerService :
MaxPercentUnhealthyReplicasPerPartition :
MaxPercentUnhealthyServices             :
MaxPercentUnhealthyDeployedApplications :
ServiceTypeHealthPolicyMap              :

I would also like to mention one upgrade scenario when a new version of your application does not contain a service that used to be part of it in the previous version. In this case the upgrade will fail with the following message:

Start-ServiceFabricApplicationUpgrade : Services must be explicitly deleted before removing their Service Types.

In order to proceed with the upgrade you need to remove the running service with Remove-​Service​Fabric​Service cmdlet first.

Tear down application

Tearing down a running application is the opposite process. First, you need to stop/remove it:

Remove-ServiceFabricApplication -ApplicationName fabric:/BookFast -Force

Then you unprovision/unregister its type:

Unregister-ServiceFabricApplicationType -ApplicationTypeName BookFastType -ApplicationTypeVersion 1.0.0 -Force

And finally, you remove the application package from the image store:

Remove-ServiceFabricApplicationPackage -ApplicationPackagePathInImageStore BookFast100 -ImageStoreConnectionString fabric:ImageStore

Global Azure Bootcamp 2017

$
0
0

On April 22, 2017 we've held a community Global Azure Bootcamp event in Minsk together with 250+ similar events that were organized by user groups around the globe. Each user group organizes their own one day deep dive class on Azure the way they see fit and how it works for their members.

Global Azure Bootcamp 2017

We've had 7 great sessions that covered various aspects of modern day development on Azure from data injection and processing to hybrid solutions to microservices and IoT. Here's the full list of talks in their chronological order:

  • Microservices and Service Fabric, by Andrei Dzimchuk, Software Architect at ScienceSoft.
  • Design of multi-tenant hybrid solution based on hybrid connections & App Service, by Alexander Laysha, Chief Software Engineer at EPAM Systems & Microsoft Azure MVP.
  • BI and big data in Azure: case study, by Roman Novik, Solution Architect at EPAM Systems.
  • Migration to Azure Search in multi-tenant solution, by Alex Zyl, Senior Software Engineer at EPAM Systems.
  • On the way to Azure: monitoring and analytics based on Elastic stack, by Artem Baranovski, Solution Architect at EPAM Systems.
  • IoT solution design based on Azure and AWS, by Michael Vatalev, Software Engineer at Klika Tech.
  • Migration to Azure: notes from the field, by Dzmitry Durasau, Solution Architect at EPAM Systems & Microsoft Azure MVP.

Re-iterating communication options in Service Fabric

$
0
0

There are a few options you have to make your services talk to each other. In this post we're going to have a quick look at them and I'll give links to resources to learn more about each option. Note that we're going to look at direct communication between services. Brokered communication is another integration option that has its pros and cons but there is nothing specific to Service Fabric.

Naming service

The first option is to make your services resolve endpoints of others directly through the Naming service.

Endpoint resolution through the Name service

Service Fabric SDK provides you with ServicePartitionResolver component that makes it easy to resolve a remote service endpoint by its canonical name, i.e. fabric:/app/service. It works both for stateless and stateful services and across applications as well. The SDK also provides ServicePartitionClient that implements caching of resoled endpoints and Retry pattern when you call them.

In this post I've covered this option in detail and also gave an example of how to implement an AutoRest based client library that relies on ServicePartitionClient. It's also clear from that post that this option requires some added implementation effort on the client library side but in the end consumers will be able to build their proxies with dependency injection and configuration and they will get Retry for free.

internal class FacilityProxy : IFacilityService
{
    private readonly IFacilityMapper mapper;
    private readonly IPartitionClientFactory<CommunicationClient<IBookFastFacilityAPI>> factory;

    public FacilityProxy(IFacilityMapper mapper,
        IPartitionClientFactory<CommunicationClient<IBookFastFacilityAPI>> factory)
    {
        this.mapper = mapper;
        this.factory = factory;
    }

    public async Task<Contracts.Models.Facility> FindAsync(Guid facilityId)
    {
        var result = await factory.CreatePartitionClient()
            .InvokeWithRetryAsync(async client =>
            {
                var api = await client.CreateApiClient();
                return await api.FindFacilityWithHttpMessagesAsync(facilityId);
            });

        if (result.Response.StatusCode == HttpStatusCode.NotFound)
        {
            throw new FacilityNotFoundException(facilityId);
        }

        return mapper.MapFrom(result.Body);
    }
}

Reverse proxy

Another option is setting up the reverse proxy in your node type(s). Once configured the proxy is running on all nodes in those node types where you chose to enable it. Your services simply issue calls to localhost:[reverseProxyPort] and let the proxy handle remote service endpoint resolution and calling of the remote service.

Endpoint resolution with Reverse proxy

You specify application and service names together with partition keys in the URL when calling the reverse proxy:

http(s)://<Cluster FQDN | internal IP>:Port/<ServiceInstanceName>/<Suffix path>?PartitionKey=<key>&PartitionKind=<partitionkind>&ListenerName=<listenerName>&TargetReplicaSelector=<targetReplicaSelector>&Timeout=<timeout_in_seconds>

You enable the reverse proxy in selected or all node types by specifying a port that the proxy should listen on in node type definitions:

"nodeTypes": [
    {
        ...
        "reverseProxyEndpointPort": "[parameters('SFReverseProxyPort')]"
    }
]

On the local dev cluster (one box scenario) the proxy is already enabled and is available on port 19081 (see FabricHostSettings.xml):

<Section Name="FabricNode">
  ...
  <Parameter Name="HttpApplicationGatewayListenAddress" Value="19081" />
  <Parameter Name="HttpApplicationGatewayProtocol" Value="http" />
</Section>

You can also set up a load balancer rule to expose the port that the reverse proxy listens on to external callers. This enable such scenarios as:

  • Exposing Kestrel or Node based services to the outside world.
  • Exposing Kestrel or Node services over HTTPS (you will need to configure a certificate for the reverse proxy). SSL termination occurs at the reverse proxy. The proxy then uses HTTP to forward requests to your services. As of runtime 5.6 you can enable HTTPS all the way to your services.
  • Exposing stateful services to the outside world. Stateful services can't be directly exposed as there is no way for the load balancer to know which nodes replicas of a particular partition are running on. You need to either provide a stateless façade as mentioned here or use the reverse proxy.

Exposing service to the outside world using the reverse proxy

In this version of BookFast I've implemented service client libraries and consuming proxies so that they can be used with the reverse proxy. Note that the client libraries are universal, i.e. they can be used both through the ServicePartitionClient or through the reverse proxy.

There are a couple of issues with consuming proxies though:

  1. They now need to implement Retry (at the proxy-to-reverse-proxy part) themselves;
  2. I had to make changes to AutoRest generated classes to support partition keys when calling stateful services. The problem is that partition keys are specified as query string parameters and currently AutoRest does not generate code that accepts optional query string parameters.

DNS service

As of runtime 5.6 you can set up a DNS service in your cluster that enables endpoint resolution using the standard DNS protocol.

To be available using the DNS protocol your services need to be assigned their DNS names. For default services you can do that in the application manifest, e.g.:

<Service Name="FacilityService" ServiceDnsName="facility.bookfast">
  <StatelessService ServiceTypeName="FacilityServiceType" InstanceCount="[FacilityService:ServiceFabric:InstanceCount]">
    <SingletonPartition />
  </StatelessService>
</Service>

For non-default services you can specify their DNS name as a new -ServiceDnsName parameter to New-ServiceFabricService cmdlet.

Consuming services will then use the DNS name in the URL when calling other services. The DNS service provides mapping between DNS names and canonical service names. Once the canonical name is determined the DNS service resolves the actual endpoint address through the Naming service and returns the address to the caller.

Endpoint resolution using Service Fabric DNS service

It's a pretty straight forward way to call stateless services and will also be useful especially in 'lift and shift' scenarios. It won't work with stateful services though as you need to be able to resolve a particular partition and replica to communicate with.

Hosting multiple externally accessible ASP.NET Core applications in Service Fabric

$
0
0

This is a really quick post to answer a question that I was asked recently about how does one host multiple services or applications in Service Fabric so that they can be accessed from outside on the same port.

WebListener

The most straight forward way is to use WebListener as your server that:

  • can be directly exposed to the outside world as it's based on the mature Http.Sys driver;
  • supports port sharing;
  • can be easily configured for HTTPS using service and application manifests.

You configure the WebListener in your services by adding Microsoft.ServiceFabric.AspNetCore.WebListener package and initializing a communication package like this:

protected override IEnumerable<ServiceInstanceListener> CreateServiceInstanceListeners()
{
    return new ServiceInstanceListener[]
    {
        new ServiceInstanceListener(serviceContext =>
            new WebListenerCommunicationListener(serviceContext, "ServiceEndpoint", (url, listener) =>
            {
                url = $"{url}/ServiceA";

                ServiceEventSource.Current.ServiceMessage(serviceContext, $"Starting WebListener on {url}");

                return new WebHostBuilder().UseWebListener()
                            .ConfigureServices(
                                services => services
                                    .AddSingleton<StatelessServiceContext>(serviceContext))
                            .UseContentRoot(Directory.GetCurrentDirectory())
                            .UseStartup<Startup>()
                            .UseApplicationInsights()
                            .UseServiceFabricIntegration(listener, ServiceFabricIntegrationOptions.None)
                            .UseUrls(url)
                            .Build();
            }))
    };
}

The key points here are:

  • you use static ports configured in service manifests, e.g.
<Endpoints>
  <Endpoint Protocol="http" Name="ServiceEndpoint" Type="Input" Port="8080" />
</Endpoints>
  • you use ServiceFabricIntegrationOptions.None option for the Service Fabric integration middleware which prevents it from adding a unique suffix to the URL that gets registered with the Naming service;
  • you add your well known suffix to the URL that will be known externally, i.e. url = $"{url}/ServiceA". You add a unique suffix for each service that you want to expose on the same port.

Here you can find a sample solution implementing all of the above.

Reverse proxy

Alternately, you may choose to expose your services through the reverse proxy. This way you can expose Kestrel or Node based services and you can set up HTTPS for the reverse proxy in the cluster ARM template as explained in the official documentation.

There are a couple of issues with this approach though:

  1. The URL may not be what you want as it will need to include internal details such as application and service names, e.g. http://mycluster.westeurope.cloudapp.azure.com/myapp/serviceA.
  2. By adding the reverse proxy to your node type you make all service running on nodes of that type accessible from outside.

Open your port to external callers

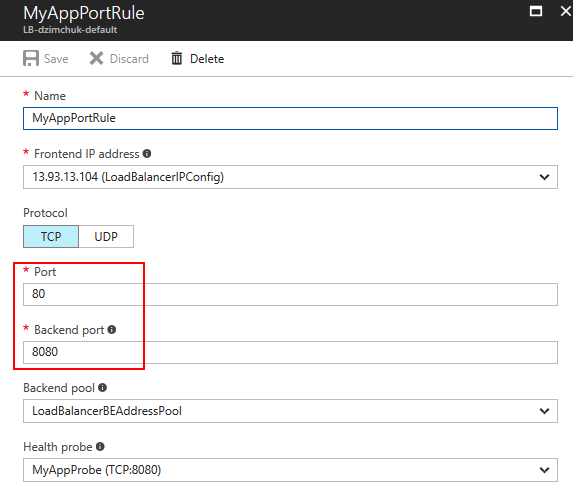
Whatever option you choose don't forget to set up a load balancing rule (and the corresponding probe rule) for your application port:

Application port load balancing rule

If you use Network Security Groups (NSGs) in your cluster you will also need to add a rule to allow inbound traffic to your port.

Be prepared for downstream failures by implementing the Circuit Breaker pattern

$
0
0
Be prepared for downstream failures by implementing the Circuit Breaker pattern

When building distributed applications we need to make sure that when we talk to a remote services or our microservices talk to each other we can handle downstream call failures and either recover automatically or gracefully degrade our own service instead of failing outright.

There are two types of downstream failures. Those that are transient in nature (such as network glitches) and auto correct themselves. We've learned to tackle them with the Retry strategy. The other type is long lasting failures when we can tell that a remote service is experiencing problems that are not likely to go away fast enough. We want to give the failing service a break by not sending requests to it for a certain period of time and at the same time we want to continue functioning by falling back to caches or alternate data source or even degrading our functionality. This is achieved by implementing the Circuit Breaker pattern.

It's important to be able to recognize the second type of failures. These are normally 50x responses but it can also be for instance HTTP 429 (Too Many Requests) when the remote service is throttling clients.

Closed -> Open -> Half-Open

The circuit breaker is essentially a state machine that acts like a proxy between your application and a remote service.

Normally it's in the closed state meaning that requests flow from your application to the remote service. Behind the scenes there is an additional error handling layer that keeps track of a number of failures that occurred calling the remote services. When this number exceeds a predefined threshold within the specified timeframe the circuit breaker switches to the open state. The logic can be more sophisticated, for example, we may want to track percentage of failures within certain timeframes and set minimum throughput for the circuit to react.

When switching to the open state the circuit breaker needs to make the application aware of the switch. Unlike the retry strategy that swallows errors the circuit breaker either raises events or captures errors into custom exception types that can be properly handled by the upstream components. The idea is to allow the application to properly adjust its behavior when the long lasting issue with the remote service has been detected.

In the open state the circuit breaker prevents calls to the remote service by returning immediately with the same well known exception type so that the application keeps functioning in the restricted mode. While in the open state the circuit breaker uses a timer to control its cool down period. When the cool down period expires the circuit breaker enters a half-open state.

In the half-open state the circuit breaker starts letting a limited number of requests through again. If these trial requests succeed then the remote service is deemed repaired and the circuit is switched to the closed state. If they fail then the circuit is back to the half-open state and the timer is reset.

Implementing the Circuit Breaker

We can implement a circuit breaker using State pattern however it might be a better idea to look for options already available. For .NET the most known one is probably Polly. In fact, Polly is a really useful library that besides the Circuit Breaker gives you implementations of Retry, Fallback, Timeout, Cache-Aside and other patterns. You can even combine multiple patterns such as Retry and Circuit Breaker using its PolicyWrap policy.

Let's have a quick look how you can use to implement a circuit breaker around your data access components. We're going to use BookFast BookingProxy as an example. First, let's create a decorator for it:

internal class CircuitBreakingBookingProxy : IBookingService
{
    private readonly IBookingService innerProxy;
    private readonly CircuitBreakerPolicy breaker =
            Policy.Handle<HttpOperationException>(ex => ex.StatusCode() >= 500 || ex.StatusCode() == 429)
            .CircuitBreakerAsync(
                exceptionsAllowedBeforeBreaking: 2,
                durationOfBreak: TimeSpan.FromMinutes(1));

    public CircuitBreakingBookingProxy(IBookingService innerProxy)
    {
        this.innerProxy = innerProxy;
    }

    public async Task<List<Booking>> ListPendingAsync()
    {
        try
        {
            return await breaker.ExecuteAsync(() => innerProxy.ListPendingAsync());
        }
        catch (HttpOperationException ex)
        {
            throw new RemoteServiceFailedException(ex.StatusCode(), ex);
        }
        catch (BrokenCircuitException ex)
        {
            throw new RemoteServiceFailedException(ex.StatusCode(), ex);
        }
    }
}

We instantiate a simple circuit breaker policy that is going to handle HttpOperationException from AutoRest generated proxy classes. We need to make sure to properly identify remote errors in your circuit breakers. In this case we're going handle all 50x and 429 errors. Our simple policy will break the circuit on 2 consecutive errors. There is a more advanced policy provided by Polly that allows you to specify percentage of g failures within set timeframes and also the minimum throughput value so the policy kicks in only when there is statistically significant number of calls, e.g.:

Policy
   .Handle<TException>(...)
   .AdvancedCircuitBreaker(
        failureThreshold: 0.5,
        samplingDuration: TimeSpan.FromSeconds(5),
        minimumThroughput: 20,
        durationOfBreak: TimeSpan.FromSeconds(30))

We need to make sure to register the circuit breaker as a singleton as it keeps state across requests:

services.AddSingleton<BookingProxy>();
services.AddSingleton<IBookingService, CircuitBreakingBookingProxy>(serviceProvider =>
    new CircuitBreakingBookingProxy(serviceProvider.GetService<BookingProxy>()));

Full implementation of the circuit breaker decorator is available here.

Be prepared for downstream failures by implementing the Circuit Breaker pattern

When the circuit breaker is in the open state Polly will throw BrokenCircuitException immediately. In our case we translate both HttpOperationException and BrokenCircuitException to our custom exception type RemoteServiceFailedException that can be propagated higher up to business components.

Cloning Azure VMs

$
0
0
Cloning Azure VMs

In order to enable deployment of preconfigured environments or to scale your IAAS workloads you may need to clone your virtual machines. The process normally involves removing computer-specific information such as device drivers, administrator account and the computer security identifier (SID) from the machine, capturing the VM image and then using this image when provisioning new VM instances.

Removing computer-specific information

The first step depends on the operating system as you use OS specific tools to set your machine to the generalized state.

Windows

On Windows, run Sysprep to clean up system identity and put it into Out-of-Box experience state.

%WINDIR%\system32\sysprep\sysprep.exe /generalize /shutdown /oobe

When it's done it's going to shut down the machine.

Linux

On Linux, run the following command on Azure agent that's going to remove machine and user specific configuration:

sudo waagent -deprovision+user -force

Then exit the SSH session.

Generalizing Azure VM

The next step is to deallocate the VM and set its status to Generalized:

Stop-AzureRmVM -Name Win01 -ResourceGroupName TestCloneVM -Force
Set-AzureRmVM -Name Win01 -ResourceGroupName TestCloneVM -Generalized

This is the Azure setting that is not OS specific.

Capturing the VM image

This step depends on the type of storage used for the VM disks.

Managed disks

If you use managed storage then you can directly create an Image resource consisting of disks that are attached to the machine.

New-AzureRmResourceGroup -Name TestImages -Location 'west europe'

$vm = Get-AzureRmVM -ResourceGroupName TestCloneVM -Name Win01
$imageConfig = New-AzureRmImageConfig -Location 'west europe' -SourceVirtualMachineId $vm.Id
New-AzureRmImage -Image $imageConfig -ImageName WinVM -ResourceGroupName TestImages

It creates a fully managed image:

$winImage = Get-AzureRmImage -ResourceGroupName TestImages -ImageName WinVM
$winImage.StorageProfile.OsDisk

OsType      : Windows
OsState     : Generalized
Snapshot    :
ManagedDisk : Microsoft.Azure.Management.Compute.Models.SubResource
BlobUri     :
Caching     : ReadWrite
DiskSizeGB  : 128

Notice that BlobUri contains no value. You can delete the original managed disk and use this image to provision new VMs.

Unmanaged disks

If you use unmanaged disks you can save the image in the same storage account that is used for VM VHDs:

Save-AzureRmVMImage -ResourceGroupName TestCloneLinuxVM -Name Lin01 -DestinationContainerName vm-images -VHDNamePrefix LinVM

It's going to store the image under the predefined path system/Microsoft.Compute/Images, e.g.: https://<account>.blob.core.windows.net/system/Microsoft.Compute/Images/vm-images/LinVM-osDisk.be6421b7-256f-4b34-b3ba-1d7bb54d4ae2.vhd.

It's also going to generate an ARM template that can be used to provision VMs from this image.

Alternately, you may want to create an Image resource with New-AzureRmImageConfig and New-AzureRmImage just like you do for managed disks. In this case the Image resource will use the same VHDs that were part of the original VM:

$linuxImage = Get-AzureRmImage -ResourceGroupName TestImages -ImageName LinVM
$linuxImage.StorageProfile.OsDisk

OsType      : Linux
OsState     : Generalized
Snapshot    :
ManagedDisk :
BlobUri     : https://<account>.blob.core.windows.net/vhds/Lin01OsDisk.vhd
Caching     : ReadWrite
DiskSizeGB  : 128

It's also possible to create Image resources from multiple arbitrary VHDs (OS and data disks) as shown here. So you can turn images captured with Save-AzureRmVMImage into proper Image resources.

Creating VMs from custom images

If you want to create a VM from an Image resource you need to specify it when setting up the VM configuration:

$image = Get-AzureRmImage -ResourceGroupName $ImageResourceGroupName -ImageName $ImageName
$vm = Set-AzureRmVMSourceImage `
    -VM $vm `
    -Id $image.Id

Then you use FromImage option when configuring the OS disk:

$osDiskName = $VMName + 'OsDisk'
$vm = Set-AzureRmVMOSDisk `
    -VM $vm `
    -Name $osDiskName `
    -DiskSizeInGB 128 `
    -CreateOption FromImage `
    -Caching ReadWrite `
    -StorageAccountType StandardLRS

If you want to go with unmanaged disks you can specify the path where the VHD will be stored:

$storageAccount = Get-AzureRmStorageAccount -ResourceGroupName $StorageAccountResourceGroupName -Name $StorageAccountName

$blobEndpoint = $storageAccount.PrimaryEndpoints.Blob.ToString()
$osDiskName = $VMName + 'OsDisk'
$osDiskUri = $blobEndpoint + "vhds/" + $osDiskName  + ".vhd"

$vm = Set-AzureRmVMOSDisk `
    -VM $vm `
    -Name $osDiskName `
    -DiskSizeInGB 128 `
    -CreateOption FromImage `
    -Caching ReadWrite `
    -VhdUri $osDiskUri

If you want to use arbitrary VHD images captured with Save-AzureRmVMImage you can do it directly with Set-AzureRmVMOSDisk without having to call Set-AzureRmVMSourceImage:

$vm = Set-AzureRmVMOSDisk `
    -VM $vm `
    -Name $osDiskName `
    -SourceImageUri $SourceImageUri `
    -Linux `
    -VhdUri $osDiskUri `
    -DiskSizeInGB 128 `
    -CreateOption FromImage `
    -Caching ReadWrite

$SourceImageUri is the path to your image, e.g. https://<account>.blob.core.windows.net/system/Microsoft.Compute/Images/vm-images/LinVM-osDisk.be6421b7-256f-4b34-b3ba-1d7bb54d4ae2.vhd. And VhdUri is the path to the new unmanaged OS disk of the provisioned VM.

Below you can find links to PowerShell scripts that can be used to create VMs from different types of custom images:

  • New Linux VM with a managed OS disk from a generalized custom Image
  • New Linux VM with an unmanaged OS disk from a generalized VHD
  • New Linux VM with an unmanaged OS disk from a gallary image
  • New Windows VM with a managed disk from a gallary image

Exposing services on different domains in Azure Service Fabric

$
0
0
Exposing services on different domains in Azure Service Fabric

Sometimes we want to expose multiple public facing services on different domain names. For instance, we could have store.contoso.com running our e-commerce site and api.constoso.com enabling 3rd party integrations. Let's see how we can achieve that in a Service Fabric cluster running in Azure.

Azure Load Balancer supports multiple front end IP configurations and it allows us to choose which IP configuration to use with a specific load balancing rule. For every custom domain we will have a separate public IP address (and the corresponding load balancer IP configuration) and for every service we will have a dedicated load balancing rule.

Exposing services on different domains in Azure Service Fabric

Each public service must be exposed on a well-known port. For instance, the e-commerce web application is exposed on port 8080 and the API app is exposed on port 8081. The idea is to configure load balancing rules to expose these services on their dedicated public IP addresses. The e-commerce application will be made available on VIP1 on port 80 (shown in blue) and the API on VIP2 on port 80 as well (shown in purple). You will probably use port 443 in real life but the idea stays the same.

Then we just need to configure CNAME records in our DNS provider to make these services available on custom domains.

Configuring Azure Load Balancer

Let's assume we have already provisioned a cluster using one of the available templates (or just through the portal). Most likely the provisioning procedure has already configured the load balancer for us.

$lb = Get-AzureRmLoadBalancer -Name $loadBalancerName -ResourceGroupName $resourceGroupName

Public endpoints

First of all, let's add public IP addresses for our services and the corresponding front end IP configurations. The following script can be used for each address:

$pip = New-AzureRmPublicIpAddress `
    -Name $pipName `
    -ResourceGroupName $resourceGroupName `
    -Location $location `
    -AllocationMethod Dynamic `
    -DomainNameLabel $domainNameLabel

$frontEndIpName = $pipName + 'Config'
$frontEndIp = New-AzureRmLoadBalancerFrontendIpConfig `
    -Name $frontEndIpName `
    -PublicIpAddress $pip

$lb.FrontendIpConfigurations.Add($frontEndIp)

Set-AzureRmLoadBalancer -LoadBalancer $lb

You can choose between Static and Dynamic allocation methods depending on how you want to expose your services. If you want to expose them on naked domains you have to allocate static addresses and configure A records in the DNS provider. But in our example we expose services on sub-domains and we can go with dynamic IP addresses.

Exposing services on sub-domains require us to configure CNAME records for each custom sub-domain to the default DNS name assigned to the IP address by Azure. But the default DNS name is only assigned if you specify a domain name label. For instance, if the domain name label is 'api' and our cluster is in West Europe the default domain name for the endpoint will be 'api.westeurope.cloudapp.azure.com'.

Setting up load balancing rules

Now we can create a load balancing rule together with a probe for each endpoint:

$probeName = 'AppProbe_Port_' + $backendPort
$probe = New-AzureRmLoadBalancerProbeConfig `
    -Name $probeName `
    -Protocol Tcp `
    -Port $backendPort `
    -IntervalInSeconds 15 `
    -ProbeCount 2

$lbRuleName = 'AppRule_Port_' + $backendPort
$lbRule = New-AzureRmLoadBalancerRuleConfig `
  -Name $lbRuleName `
  -FrontendIpConfiguration $frontEndIp `
  -BackendAddressPool $lb.BackendAddressPools[0] `
  -Protocol Tcp `
  -FrontendPort 80 `
  -BackendPort $backendPort `
  -Probe $probe

$lb.Probes.Add($probe)
$lb.LoadBalancingRules.Add($lbRule)

Set-AzureRmLoadBalancer -LoadBalancer $lb

Each rule references a particular IP configuration ($frontEndIp) and will be used to route traffic from port 80 on the public endpoint to the backend port on the load balancer's backend pool of addresses.

The full script can be found here.

Moving Azure VM with managed disks to another subscription

$
0
0
Moving Azure VM with managed disks to another subscription

The problem is that it's not currently supported. Well, at least at the time of writing. The only way around this is to export your managed disks, that is, store them as regular page blobs and recreate your VM. If you just use managed data disks (and the OS one is unmanaged) then you don't have to recreate the VM. But in both cases you're going to experience some downtime because you can't export a managed disk that is currently attached (that is the VM that's using it is running). The disk has to be either unattached or in the reserved state. The reserved state is when your VM is deprovisioned.

And it's unfortunate because the export process is not fast. It's pretty far from being fast in fact. With a regular 128Gb disk it may take about 2 hours to complete (although it looks like the blob copying operation is pretty effiecient and it only spends time when copying the actual data within a preallocated blob). So you should really consider if it's worth redeploying your workload on a newly provisioned VM instead of moving the existing one. Also make sure you have redundant deployments for workloads that can't tolerate downtime.

But there are cases when the redeploy requires much more effort. This post is to provide you with fairly automated steps to perform the move. The good news is that it's the actual export process and creation of the new VM that require downtime. You can move a running VM to another subscription while it's running and serving requests.

Alright, so we're dealing with a 3 step process:

  • exporting managed disks
  • recreating the VM
  • actually moving the new VM and all the related resources (including the storage account with exported disks) to a new subscription

You can optimize this process by moving the storage account while the old VM (that is still using managed disks) is running and creating a new VM directly in the new subscription.

To simplify things I'm going to follow the outlined process in this post and assume you just have a single OS disk and no data disks in code samples.

Exporting a managed disk

You can copy a managed disk to a storage account by first requesting a temporary URI to the disk with a SAS token:

$grant = Grant-AzureRmDiskAccess -ResourceGroupName $ResourceGroupName -DiskName $DiskName -Access Read -DurationInSecond 10800

Here I used 3 hours as the duration of the token, you may want to adjust depending on the size of your disk. The URI is going to be available through the grant.AccessSAS property.

Then you initiate the copy operation with Start-AzureStorageBlobCopy:

$storageAccountKey = Get-AzureRmStorageAccountKey -ResourceGroupName $StorageAccountResourceGroupName -Name $StorageAccountName
$storageContext = New-AzureStorageContext -StorageAccountName $StorageAccountName -StorageAccountKey $storageAccountKey.Value[0]

$containerName = "vhds"
$container = Get-AzureStorageContainer $containerName -Context $storageContext -ErrorAction Ignore
if ($container -eq $null)
{
    New-AzureStorageContainer $containerName -Context $storageContext
}

$vhd = $DiskName + '.vhd'
$blob = Start-AzureStorageBlobCopy -AbsoluteUri $grant.AccessSAS -DestContainer $containerName -DestBlob $vhd -DestContext $storageContext

You can request the status of the copy operation with the Get-AzureStorageBlobCopyState cmdlet. You basically need to wait until it's finished:

$status = $blob | Get-AzureStorageBlobCopyState
$status
 
While($status.Status -eq "Pending"){
  Start-Sleep 30
  $status = $blob | Get-AzureStorageBlobCopyState
  $status
}

Recreating a VM

Like I've mentioned you may want to create the new VM directly in the destination subscription while the old VM is running. You will minimize downtime and be able to test the new deployment before killing the old VM. You will also need to prepare the required resources (network, NSG, IP address(es), etc) in the new subscription before creating the VM.

But in this post we're going to keep things simple and recreate the VM in the original resource group of the original subscription. I can't say it's a recommended way as you're going to have to drop the original VM first and then re-assign its NIC(s) to the new one and there is always a chance that something goes wrong in between.

# Get the storage account where you've exported the disk to
$storageAccount = Get-AzureRmStorageAccount `
    -ResourceGroupName $storageAccountResourceGroupName `
    -Name $storageAccountName

$blobEndpoint = $storageAccount.PrimaryEndpoints.Blob.ToString()
$osDiskUri = $blobEndpoint + "vhds/" + $osDiskName  + ".vhd"

# Get the existing VM
$originalVm = Get-AzureRmVM -ResourceGroupName $resourceGroupName -Name $vmName

# Point of no return (well, sort of)
Remove-AzureRmVM -ResourceGroupName $resourceGroupName -Name $vmName

# Create a new VM with the same name and size
$newVm = New-AzureRmVMConfig -VMName $originalVm.Name -VMSize $originalVm.HardwareProfile.VmSize

Set-AzureRmVMOSDisk `
    -VM $newVm `
    -Name $osDiskName `
    -VhdUri $osDiskUri `
    -Caching ReadWrite `
    -CreateOption Attach `
    -Windows

foreach($nic in $originalVm.NetworkProfile.NetworkInterfaces)
{
    Add-AzureRmVMNetworkInterface -VM $newVm -Id $nic.Id
}

New-AzureRmVM -ResourceGroupName $resourceGroupName -Location $location -VM $newVm

The key point here is to attach (-CreateOption Attach) the exported disk with the Set-AzureRmVMOSDisk cmdlet to the new VM. You should also specify if it's -Windows or -Linux, I guess it's a pure Azure setting that may be required for internal placement decision but you never know.

And of course you need to add the VM to the existing network by adding the old one's NIC(s) to it.

Moving VM to another subscription

You want to make sure to move all related resources with it. Realistacally your network is going to be in another resource group as it has a different lifetime then your VMs. The same may be true for storage accounts. But in this post we assume a simple case when you have a VM created from the portal and all resources are in the same group.

if ((Get-AzureRmSubscription -SubscriptionId $subscriptionId).TenantId -ne (Get-AzureRmSubscription -SubscriptionId $destinationSubscriptionId).TenantId)
{
    throw "Source and destination subscriptions are not associated with the same tenant"
}

Set-AzureRmContext -Subscription $destinationSubscriptionId

#Register-AzureRmResourceProvider -ProviderNamespace Microsoft.Compute
#Register-AzureRmResourceProvider -ProviderNamespace Microsoft.Network
#Register-AzureRmResourceProvider -ProviderNamespace Microsoft.Storage

$rg = Get-AzureRmResourceGroup -Name $destinationResourceGroupName -Location $destinationLocation -ErrorAction Ignore
if (-Not $rg)
{
    $rg = New-AzureRmResourceGroup -Name $destinationResourceGroupName -Location $destinationLocation
}

Set-AzureRmContext -Subscription $subscriptionId

$resources = Get-AzureRmResource -ResourceId "/subscriptions/$subscriptionId/resourceGroups/$resourceGroupName/resources" `
    | ? { $_.ResourceType -ne 'Microsoft.Compute/virtualMachines/extensions' } `
    | select -ExpandProperty ResourceId

Move-AzureRmResource -DestinationSubscriptionId $destinationSubscriptionId -DestinationResourceGroupName $destinationResourceGroupName -ResourceId $resources

There are some preconditions that you need to check. Both subscriptions have to be associated with the same Azure AD tenant and there have to be required resource providers registered in the destination subscription. At the very least you will need Microsoft.Compute, Microsoft.Network and Microsoft.Storage which may be already registered if you have some other resources of the corresponding types in the subscription.

Notice that you should also exclude VM extensions as they are not top level resources and are going to be moved together with the VM. And of course you want to make sure you have deleted the old managed disk before running this script.

Setting up your ASP.NET Core 2.0 apps and services for Azure AD B2C

$
0
0
Setting up your ASP.NET Core 2.0 apps and services for Azure AD B2C

It's been over 1.5 years since I'd posted an article on integrating ASP.NET Core 1.x applictions with Azure AD B2C. As I was upgrading my sample application to ASP.NET Core 2.0 it became obvious that changes that I had to make were not only limited to the revamped authentication middleware and security related APIs (a great summary of which can be found in this issue on GitHub). Azure AD B2C has greatly evolved too and now it supports separate API and client apps, delegated access configured with scopes and proper access tokens.

It's too many changes that have literally rendered my previous post obsolete and prompted me to write a new version of it.

Test application

A sample application is available on GitHub. It consists of a Web API project (which is pretty much the default template armored with JWT Bearer authentication middleware) and an MVC client that calls the API and displays a list of claims it receives in the ID token.

Setting up your ASP.NET Core 2.0 apps and services for Azure AD B2C

The application uses the Hybrid Flow and supports common customer facing scenarios such as self sign-up, profile editing and password reset. It demoes configuration of the ASP.NET Core authentication middleware for OpenID Connect and the Microsoft Authentication Library (MSAL).

Configuring Azure AD B2C applications and policies

Just like you do in the regular Azure AD you can now register separate applications in B2C to represent your APIs and client applications. You can further fine-tune what delegated permissions are required by the clients and you get normal access tokens in additional to ID and refresh tokens from Azure AD B2C (for those who are new to B2C, in the past you had to use the same app for APIs and clients and use ID tokens in place of access tokens when calling your APIs).

Setting up your ASP.NET Core 2.0 apps and services for Azure AD B2C

One important setting to make sure to specify for the API app is the App ID Uri. This Uri is going to be used as a prefix for custom scopes that your API exposes and that should be requested by clients.

You declare your custom scopes in the "Published scopes" section of the API app.

Setting up your ASP.NET Core 2.0 apps and services for Azure AD B2C

Combined with the App ID our sample published scope will be

https://devunleashedb2c.onmicrosoft.com/testapi/read_values

This is the value that should be included as part of the scope parameter by the client when making requests to authorize and/or token endpoints. Note by default all apps come with the user_impersonation scope that can be used if there is no need to limit what portions of the APIs are available for particular clients and they just need to be able to call the APIs on behalf of signed in users.

For the client app it's important to specify reply Url(s) which should contain those to be specified when making requested to the directory.

Setting up your ASP.NET Core 2.0 apps and services for Azure AD B2C

If your client is confidential (that is, a server side application) you need to generate client keys in the appropriate section of the blade. Full client credentials are required by the Authorization Code and the Hybrid flows.

Finally, you assign exposed scopes of APIs that need to be available to clients.

Setting up your ASP.NET Core 2.0 apps and services for Azure AD B2C

Create and configure B2C policies

In Azure AD B2C policies define the end user experience and enable much greater customization options than the ones available in the classic directory. Official documentation covers policies and other concepts in great details so I suggest you have a look at it.

In Azure AD B2C the policy is a required parameter in requests to authorization and token endpoints. For instance, if we query the metadata endpoint with a particular policy:

GET https://login.microsoftonline.com/devunleashedb2c.onmicrosoft.com/v2.0/.well-known/openid-configuration?p=b2c_1_testsignupandsigninpolicy

We get the following output:

{
  "issuer": "https://login.microsoftonline.com/bc2fb659-725b-48d8-b571-7420094e41cc/v2.0/",
  "authorization_endpoint": "https://login.microsoftonline.com/devunleashedb2c.onmicrosoft.com/oauth2/v2.0/authorize?p=b2c_1_testsignupandsigninpolicy",
  "token_endpoint": "https://login.microsoftonline.com/devunleashedb2c.onmicrosoft.com/oauth2/v2.0/token?p=b2c_1_testsignupandsigninpolicy",
  "end_session_endpoint": "https://login.microsoftonline.com/devunleashedb2c.onmicrosoft.com/oauth2/v2.0/logout?p=b2c_1_testsignupandsigninpolicy",
  "jwks_uri": "https://login.microsoftonline.com/devunleashedb2c.onmicrosoft.com/discovery/v2.0/keys?p=b2c_1_testsignupandsigninpolicy",
  "response_modes_supported": [
    "query",
    "fragment",
    "form_post"
  ],
  "response_types_supported": [
    "code",
    "id_token",
    "code id_token"
  ],
  "scopes_supported": [
    "openid"
  ],
  "subject_types_supported": [
    "pairwise"
  ],
  "id_token_signing_alg_values_supported": [
    "RS256"
  ],
  "token_endpoint_auth_methods_supported": [
    "client_secret_post"
  ],
  "claims_supported": [
    "oid",
    "newUser",
    "idp",
    "emails",
    "name",
    "sub"
  ]
}

Not only does it provide policy specific endpoints, it also gives information about claims that I configured to be included in tokens for this specific policy.

There are 2 ways you can specify the policy:

  • as a p query string parameter as in the example above
  • as a URL segment when using special tfp URL format
public string GetAuthority(string policy) => $"{Instance}tfp/{TenantId}/{policy}/v2.0";

So in our example, we could have called the metadata endpoint with the following URL:

https://login.microsoftonline.com/tfp/devunleashedb2c.onmicrosoft.com/b2c_1_testsignupandsigninpolicy/v2.0/.well-known/openid-configuration

And the response would indicate:

https://login.microsoftonline.com/te/devunleashedb2c.onmicrosoft.com/b2c_1_testsignupandsigninpolicy/oauth2/v2.0/authorize

as the authorize endpoint.

While we're at it, it's essential that we properly configure claims to be included in tokens when using all planned policies. Each policy has the same set of settings and first of all it's important to include the Object ID claim which is the unique identifier of the user.

Setting up your ASP.NET Core 2.0 apps and services for Azure AD B2C

It's important to enable it in all policies that are going to be used in your application and here is why. Different scenarios such as profile editing or password reset are handled by redirecting the user to the authorize endpoint. And upon return the application is supposed to reconstruct the security context and follow the OpenID Connect spec to redeem the authorization code (yes, all these scenarios are piggy backed on the standard flows). User ID is the essential claim to be present in all responses from the authorize endpoint. For example, it's used as part of the token's cache key which we're going to talk about later in this post.

There are a couple of more settings affecting claims which are specified at the policy level:

Setting up your ASP.NET Core 2.0 apps and services for Azure AD B2C

The first one is the sub claim that often represents the user ID. Because we've already included the Object ID (oid claim mapped to http://schemas.microsoft.com/identity/claims/objectidentifier claim type used in .NET) we can disable it (that's why you see the unsupported message for the nameidentifier .NET claim in the sample application).

The second claim is the one that identifies the policy that was used to call the authorize endpoint. This claim is used later when you need to redeem the authorization code by calling the appropriate token endpoint or when signing out the user. By default it's set to acr which is mapped to http://schemas.microsoft.com/claims/authnclassreference claim type in .NET.

By the way, all these claim mappings can be customized and even disabled so you can use short claim types (e.g. sub, scp, etc) but this is a topic for another post.

Our sample application requires 3 policies:

  • Sign up and Sign in. This is a combined policy that enables self sign-up.
  • Profile editing.
  • Password reset.

Configuring Web API

Configuration of Microsoft.AspNetCore.Authentication.JwtBearer middleware in your API apps is quite simple:

public void ConfigureServices(IServiceCollection services)
{
    services.Configure<AuthenticationOptions>(configuration.GetSection("Authentication:AzureAd"));

    var serviceProvider = services.BuildServiceProvider();
    var authOptions = serviceProvider.GetService<IOptions<AuthenticationOptions>>();

    services.AddAuthentication(JwtBearerDefaults.AuthenticationScheme) // sets both authenticate and challenge default schemes
        .AddJwtBearer(options =>
        {
            options.MetadataAddress = $"{authOptions.Value.Authority}/.well-known/openid-configuration?p={authOptions.Value.SignInOrSignUpPolicy}";
            options.Audience = authOptions.Value.Audience;
        });
}

Instead of setting the authority (which is the tenant's URL in the classic directory), you specify the full URL to the OpenID Connect metadata endpoint. This way you can specify the policy parameter. What's interesting is that even though you can request access tokens using various policies your API app will be able to validate them using just any of them.

Configuring MVC client

In a web client you use a pair of the Cookies and OpenID Connect middleware and also the Microsoft Authentication Library to help with token management.

Configuration of the middleware is slightly more involved:

private static void ConfigureAuthentication(IServiceCollection services)
{
    var serviceProvider = services.BuildServiceProvider();

    var authOptions = serviceProvider.GetService<IOptions<B2CAuthenticationOptions>>();
    var b2cPolicies = serviceProvider.GetService<IOptions<B2CPolicies>>();

    var distributedCache = serviceProvider.GetService<IDistributedCache>();
    // this is needed when using in-memory cache (because 2 different service providers are going to be used and thus 2 in-memory dictionaries)
    services.AddSingleton(distributedCache);

    services.AddAuthentication(options =>
    {
        options.DefaultScheme = CookieAuthenticationDefaults.AuthenticationScheme;
        options.DefaultChallengeScheme = Constants.OpenIdConnectAuthenticationScheme;
    })
    .AddCookie()
    .AddOpenIdConnect(Constants.OpenIdConnectAuthenticationScheme, options =>
    {
        options.Authority = authOptions.Value.Authority;
        options.ClientId = authOptions.Value.ClientId;
        options.ClientSecret = authOptions.Value.ClientSecret;
        options.SignedOutRedirectUri = authOptions.Value.PostLogoutRedirectUri;

        options.ConfigurationManager = new PolicyConfigurationManager(authOptions.Value.Authority,
                                       new[] { b2cPolicies.Value.SignInOrSignUpPolicy, b2cPolicies.Value.EditProfilePolicy, b2cPolicies.Value.ResetPasswordPolicy });

        options.Events = CreateOpenIdConnectEventHandlers(authOptions.Value, b2cPolicies.Value, distributedCache);

        options.ResponseType = OpenIdConnectResponseType.CodeIdToken;
        options.TokenValidationParameters = new TokenValidationParameters
        {
            NameClaimType = "name"
        };

        // we have to set these scope that will be used in /authorize request
        // (otherwise the /token request will not return access and refresh tokens)
        options.Scope.Add("offline_access");
        options.Scope.Add($"{authOptions.Value.ApiIdentifier}/read_values");
    });
}

Notice how you set the OpenID Connect middleware to be used for challenge requests and the Cookie middleware for the rest. Another important thing to remember is to include the same set of scopes when redirecting the the authorize endpoint as well as redeeming the authorization code (shown below). Otherwise the response from the token endpoint won't include access and refresh tokens.

The role of the custom configuration manager becomes apparent in various event handlers:

private static OpenIdConnectEvents CreateOpenIdConnectEventHandlers(B2CAuthenticationOptions authOptions, B2CPolicies policies, IDistributedCache distributedCache)
{
    return new OpenIdConnectEvents
    {
        OnRedirectToIdentityProvider = context => SetIssuerAddressAsync(context, policies.SignInOrSignUpPolicy),
        OnRedirectToIdentityProviderForSignOut = context => SetIssuerAddressForSignOutAsync(context, policies.SignInOrSignUpPolicy),
        OnAuthorizationCodeReceived = async context =>
                                      {
                                          ...
                                      },
        OnMessageReceived = context =>
        {
            ...
        }
    };
}

private static async Task SetIssuerAddressAsync(RedirectContext context, string defaultPolicy)
{
    var configuration = await GetOpenIdConnectConfigurationAsync(context, defaultPolicy);
    context.ProtocolMessage.IssuerAddress = configuration.AuthorizationEndpoint;
}

private static async Task SetIssuerAddressForSignOutAsync(RedirectContext context, string defaultPolicy)
{
    var configuration = await GetOpenIdConnectConfigurationAsync(context, defaultPolicy);
    context.ProtocolMessage.IssuerAddress = configuration.EndSessionEndpoint;
}

private static Task<OpenIdConnectConfiguration> GetOpenIdConnectConfigurationAsync(RedirectContext context, string defaultPolicy)
{
    var manager = (PolicyConfigurationManager)context.Options.ConfigurationManager;
    var policy = context.Properties.Items.ContainsKey(Constants.B2CPolicy) ? context.Properties.Items[Constants.B2CPolicy] : defaultPolicy;

    return manager.GetConfigurationByPolicyAsync(CancellationToken.None, policy);
}

The idea is to use proper URLs for the authorize endpoint depending on the policy that is set by the AccountController in response to appropriate actions: sign in, sign up, edit profile, password reset or sign out. Please check out the code to get a better picture of how things work. The alternative solution would be using the tfp URL formats and replacing the policy name in the URL itself.

Using MSAL to redeem authorization code and manage tokens

Microsoft Authentication Library (MSAL) is the "next generation" library for managing tokens that should be used with v2 endpoints (as apposed to Active Directory Authentication Library (ADAL) that is to be used with classic v1 endpoints).

You redeem the authorization code in OnAuthorizationCodeReceived event handler:

OnAuthorizationCodeReceived = async context =>
{
    try
    {
        var principal = context.Principal;

        var userTokenCache = new DistributedTokenCache(distributedCache, principal.FindFirst(Constants.ObjectIdClaimType).Value).GetMSALCache();
        var client = new ConfidentialClientApplication(authOptions.ClientId,
            authOptions.GetAuthority(principal.FindFirst(Constants.AcrClaimType).Value),
            "https://app", // it's not really needed
            new ClientCredential(authOptions.ClientSecret),
            userTokenCache,
            null);

        var result = await client.AcquireTokenByAuthorizationCodeAsync(context.TokenEndpointRequest.Code,
            new[] { $"{authOptions.ApiIdentifier}/read_values" });

        context.HandleCodeRedemption(result.AccessToken, result.IdToken);
    }
    catch (Exception ex)
    {
        context.Fail(ex);
    }
}

There are a few important notes to make here:

  • Specifying a per-user token cache (described below).
  • Specifying the authority using the tfp format and policy name from the acr claim. This is important as this code is going to get executed as part of sign-in, profile editing and password reset flows. Failure to provide the correct policy will result in the following error: AADB2C90088: The provided grant has not been issued for this endpoint. Actual Value : B2C_1_TestSignUpAndSignInPolicy and Expected Value : B2C_1_TestProfileEditPolicy.
  • Sending the same set of claims the token endpoint that you send to the authorize endpoint.
  • Notifying the OpenID Connect middleware that you've redeemed the code by calling HandleCodeRedemption.

Implementing a distributed token cache

I've seen crazy implementations of the token cache even in official samples. It's much more straightforward when your cache is implemented on a per-user basis. I've already described such an implemented for ADAL here and here's the version for MSAL:

internal class DistributedTokenCache
{
    private readonly IDistributedCache distributedCache;
    private readonly string userId;

    private readonly TokenCache tokenCache = new TokenCache();

    public DistributedTokenCache(IDistributedCache cache, string userId)
    {
        this.distributedCache = cache;
        this.userId = userId;

        tokenCache.SetBeforeAccess(OnBeforeAccess);
        tokenCache.SetAfterAccess(OnAfterAccess);
    }

    public TokenCache GetMSALCache() => tokenCache;

    private void OnBeforeAccess(TokenCacheNotificationArgs args)
    {
        var userTokenCachePayload = distributedCache.Get(CacheKey);
        if (userTokenCachePayload != null)
        {
            tokenCache.Deserialize(userTokenCachePayload);
        }
    }

    private void OnAfterAccess(TokenCacheNotificationArgs args)
    {
        if (tokenCache.HasStateChanged)
        {
            var cacheOptions = new DistributedCacheEntryOptions
            {
                AbsoluteExpirationRelativeToNow = TimeSpan.FromDays(14)
            };

            distributedCache.Set(CacheKey, tokenCache.Serialize(), cacheOptions);

            tokenCache.HasStateChanged = false;
        }
    }

    private string CacheKey => $"TokenCache_{userId}";
}

The cache relies on IDistributedCache abstraction and you get in-memory, Redis and SQL Server implementations in ASP.NET Core out of the box.

Calling the API

When calling the API you need to obtain access token from MSAL cache (and let it handle token refresh if appropriate):

public async Task<string> GetValuesAsync()
{
    var client = new HttpClient { BaseAddress = new Uri(serviceOptions.BaseUrl, UriKind.Absolute) };
    client.DefaultRequestHeaders.Authorization =
        new AuthenticationHeaderValue("Bearer", await GetAccessTokenAsync());

    return await client.GetStringAsync("api/values");
}

private async Task<string> GetAccessTokenAsync()
{
    try
    {
        var principal = httpContextAccessor.HttpContext.User;

        var tokenCache = new DistributedTokenCache(distributedCache, principal.FindFirst(Constants.ObjectIdClaimType).Value).GetMSALCache();
        var client = new ConfidentialClientApplication(authOptions.ClientId,
                                                  authOptions.GetAuthority(principal.FindFirst(Constants.AcrClaimType).Value),
                                                  "https://app", // it's not really needed
                                                  new ClientCredential(authOptions.ClientSecret),
                                                  tokenCache,
                                                  null);

        var result = await client.AcquireTokenSilentAsync(new[] { $"{authOptions.ApiIdentifier}/read_values" },
            client.Users.FirstOrDefault());

        return result.AccessToken;
    }
    catch (MsalUiRequiredException)
    {
        throw new ReauthenticationRequiredException();
    }
}

If the refresh token has expired (or for whatever reason there was no access token in cache) we have to propose the user to re-authenticate. Notice that we translate MsalUiRequiredException into our custom ReauthenticationRequiredException which is handled by the global exception filter by initiating the challenge flow:

public void OnException(ExceptionContext context)
{
    if (!context.ExceptionHandled && IsReauthenticationRequired(context.Exception))
    {
        context.Result = new ChallengeResult(
                Constants.OpenIdConnectAuthenticationScheme,
                new AuthenticationProperties(new Dictionary<string, string> { { Constants.B2CPolicy, policies.SignInOrSignUpPolicy } })
                {
                    RedirectUri = context.HttpContext.Request.Path
                });

        context.ExceptionHandled = true;
    }
}

Handle profile editing

One of the policy types supported by Azure AD B2C is profile editing which allows users to provide their info such as address details, job title, etc. The way you trigger this whole process is by returning a ChallengeResult, e.g.:

public IActionResult Profile()
{
    if (User.Identity.IsAuthenticated)
    {
        return new ChallengeResult(
            Constants.OpenIdConnectAuthenticationScheme,
            new AuthenticationProperties(new Dictionary<string, string> { { Constants.B2CPolicy, policies.EditProfilePolicy } })
            {
                RedirectUri = "/"
            });
    }

    return RedirectHome();
}

This will successfully redirect the user to the profile editing page:

Setting up your ASP.NET Core 2.0 apps and services for Azure AD B2C

If the user hits 'Continue' she will be redirected back to the application with the regular authentication response containing state, nonce, authorization code and ID token (depending on the OpenID Connect flow).

But if the user hits 'Cancel' Azure AD B2C will return an error response, oops:

POST https://localhost:8686/signin-oidc-b2c HTTP/1.1
Content-Type: application/x-www-form-urlencoded

error=access_denied
&
error_description=AADB2C90091: The user has cancelled entering self-asserted information.
Correlation ID: 3ed683a1-d742-4f59-beb8-86bc22bb7196
Timestamp: 2017-01-30 12:15:15Z

This somewhat unexpected response from Azure AD makes the middleware fail the authentication process. And it's correct from the middleware's standpoint as there are no artifacts to validate.

To mitigate this we're going to have to intercept the response and prevent the middleware from raising an error:

OnMessageReceived = context =>
{
    if (!string.IsNullOrEmpty(context.ProtocolMessage.Error) &&
        !string.IsNullOrEmpty(context.ProtocolMessage.ErrorDescription))
    {
        if (context.ProtocolMessage.ErrorDescription.StartsWith("AADB2C90091")) // cancel profile editing
        {
            context.HandleResponse();
            context.Response.Redirect("/");
        }
    }

    return Task.FromResult(0);
}

There is nothing we need to do in regards to the security context because profile editing could only be triggered when the user had already been signed in.

Handle password reset

Password reset is another essential self-service flow supported by Azure AD B2C. However as any other flow it's handled by sending the user to the authorize endpoint and because the 'Sign up or sign in' policy does not support it (for the time being) we're going to get sent back to the middleware with an error: AADB2C90118: The user has forgotten their password. when the user clicks 'Forgot your password?'.

Setting up your ASP.NET Core 2.0 apps and services for Azure AD B2C

You can handle it again in the OnMessageReceived by redirecting to the dedicated action:

OnMessageReceived = context =>
{
    if (!string.IsNullOrEmpty(context.ProtocolMessage.Error) &&
        !string.IsNullOrEmpty(context.ProtocolMessage.ErrorDescription))
    {
        ...
        else if (context.ProtocolMessage.ErrorDescription.StartsWith("AADB2C90118")) // forgot password
        {
            context.HandleResponse();
            context.Response.Redirect("/Account/ResetPassword");
        }
    }

    return Task.FromResult(0);
}

which will trigger another challenge flow with the proper policy:

public IActionResult ResetPassword()
{
    return new ChallengeResult(
            Constants.OpenIdConnectAuthenticationScheme,
            new AuthenticationProperties(new Dictionary<string, string> { { Constants.B2CPolicy, policies.ResetPasswordPolicy } })
            {
                RedirectUri = "/"
            });
}

Azure AD B2C will verify the user by sending a code to her email:

Setting up your ASP.NET Core 2.0 apps and services for Azure AD B2C

And finally let the user provide a new password for her account:

Setting up your ASP.NET Core 2.0 apps and services for Azure AD B2C

This has been a lengthy post but I thought readers would find it helpful when I explained certain details of the implementations. As mentioned, the full sample solution can be found here.
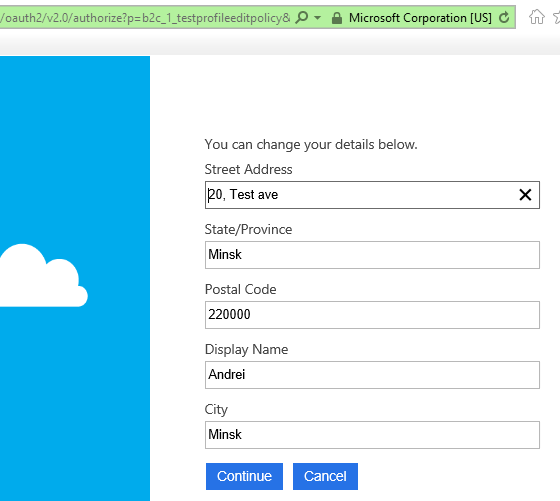

Managing database schema and seeding data with EF Core migrations

$
0
0

This post is a quick reference on using EF Core migrations to apply incremental changes to the database including schema updates and static data.

We're going to cover the following topics:

  1. Preparing your data access projects for migrations.
  2. Adding migrations to a data project.
  3. Applying migrations to the database.
  4. Pre-filling the database with static data.
  5. Adding and updating SQL scripts based on migrations.

Preparing your data access projects for migrations

It's bit of a shame but even as of 2.0 version of EF Core CLI it's not possible to use .NET Standard class libraries containing your data access layer with migrations. The problem is that CLI requires a 'startup' project to bootstrap the EF context and the startup project needs to be an executable one. Thus, you will need to turn these class libraries into apps:

<Project Sdk="Microsoft.NET.Sdk">

  <PropertyGroup>
    <TargetFramework>netcoreapp2.0</TargetFramework>
    <OutputType>Exe</OutputType>
  </PropertyGroup>

  <ItemGroup>
    <PackageReference Include="Microsoft.EntityFrameworkCore.SqlServer" Version="2.0.1" />
    <PackageReference Include="Microsoft.EntityFrameworkCore.Tools" Version="2.0.1" />
  </ItemGroup>

  <ItemGroup>
    <DotNetCliToolReference Include="Microsoft.EntityFrameworkCore.Tools.DotNet" Version="2.0.1" />
  </ItemGroup>

</Project>

You could alternately use the --startup-project switch to point to your actual app project but most likely this is going to be your web app and at the bare minimum it must reference Microsoft.EntityFrameworkCore.Design package which you may not be comfortable referencing due to an obvious issue with separation of concerns.

The next thing to take care of is DbContext initialization when running CLI commands. As of EF Core 2.0 you can add an implementation of IDesignTimeDbContextFactory interface to the data project that would create the context. The factory will need a connection string to initialize the context. The problem is that you can't pass parameters from the command line! There is an open issue on GitHub so hopefully it's going to be addressed in one of the upcoming releases. But for now environment variables are our only friends:

internal class DesignTimeTestContextFactory : IDesignTimeDbContextFactory<TestContext>
{
    public TestContext CreateDbContext(string[] args)
    {
        var targetEnv = Environment.GetEnvironmentVariable("TargetEnv");
        if (string.IsNullOrWhiteSpace(targetEnv))
        {
            throw new ArgumentException("No target environment has been specified. Please make sure to define TargetEnv environment variable.");
        }
        
        var optionsBuilder = new DbContextOptionsBuilder<TestContext>()
            .UseSqlServer(ConfigurationHelper.GetConnectionString(targetEnv));

        return new TestContext(optionsBuilder.Options);
    }
}

The sample code above assume per-environment configuration. The implementation of ConfigurationHelper is up to your depending on how and where you store configurations.

Before running any EF Core CLI commands make sure to define the TargetEnv variable for the current process:

set TargetEnv=Dev

Adding migrations to a data project

Once you've modified your data model you need to add a new migration to reflect the changes. Open up a console prompt and cd to your data project.

It's important to use well-thought naming conventions for migrations. This will let you easily identify the sequence of migrations in source code and in __EFMigrationsHistory table. This can be useful when you need to reference specific migrations from CLI as shown in the examples below or check what migrations have been already applied to the database. One possible convention might be:

<Service name>_<Index>, e.g. FacilityService_001

To add a migration execute the following command:

dotnet ef migrations add FacilityService_00X

Applying migrations to the database

The following command applies all new migrations that have been added since the last applied one:

dotnet ef database update

You can also specify up to what migrations you want to apply changes.

Pre-filling the database with static data

Seeding the database with static data is a common need. In EF Core 2.1 it will be possible to populate the database with initial data using the new API. In EF Core 2.0 you can do that by adding new empty migrations and using the following APIs to add, update or delete data:

MigrationBuilder.InsertData
MigrationBuilder.UpdateData
MigrationBuilder.DeleteData

Please not that as of 2.0 there is still an issue in UpdateData that ignores the specified schema parameter. So you will have to work around it by first dropping the old records and reinserting updated ones. Things will get quickly complicated when you also need to drop and recreate constraints but this is the current state of things.

Adding and updating SQL scripts based on migrations

You can probably do well with just using the tooling but if for some reason you need SQL version of your migrations here's how you do it.

For the very first migration (001) you specify 0 as the starting point:

dotnet ef migrations script 0 FacilityService_001 -i -o ../Database/FacilityService_001.sql

For subsequent migrations you specify the existing migration as a starting point (e.g. FacilityService_001) and the newly added migration as a target point (e.g. FacilityService_002):

dotnet ef migrations script FacilityService_001 FacilityService_002 -i -o ../Database/FacilityService_002.sql

You can also generate a script that will include all migrations for your data project:

dotnet ef migrations script -i -o ../Database/FacilityService.sql

Make sure to generate idempotent scripts using the -i switch.

Reliable domain events

$
0
0

Events are an important concept of domain-driven design as they are the primary mechanism that enables entities within an aggregate to communicate with the outside world, be it other aggregates or other bounded contexts.

There is a common problem that developers face when implementing domain events. How do we make them reliable? That is, how can we make sure they are consistent with the state of the aggregates that triggered them?

The ultimate solution might be event sourcing when we make events themselves to be the primary source of truth for the aggregate state. But it may not always be feasible to implement event sourcing in our existing domains or it can be quite a paradigm shift for many developers. Often, it will be considered an overkill for the task at hand.

If our data and our events are separated when should we fire them? And how can we handle them reliably?

If we fire them before completing the business operation and the completion fails we will need to take compensating actions to undo changes caused by the events (which may not even be possible when the events have triggered operations in external systems beyond our control). If we fire them after completing the business operation there is a risk of failure happening just before sending the events resulting in inconsistency between the triggering aggregate and the components that should have been notified of the change.

I'm going to walk you through an approach that I've been applying in my projects and that seems to have been serving well so far. It's not a universal solution as it presents certain requirements towards your storage (mainly the ability to atomically persist multiple pieces of data).

You can check out my sample playground app BookFast that makes use of the ideas described in this post. I'm going to be giving links to certain files and provide code samples in the post but to get the whole picture you might want to examine the solution in an IDE.

Event groups

The approach that I'm using splits all domain events into 2 groups which have different triggering logic:

  1. Those that are atomic with the originating aggregate. These are in process plain domain events that get fired and handled within the same transaction as the changes in the originating aggregate. These events should not trigger activities in external services.
  2. Those that are eventually fired and handled. They get persisted atomically together with the originating aggregate and dispatched by a separate background mechanism. Integration events naturally fall into this category but it is possible to route events targeting the same bounded context through the same mechanism if eventual consistency is acceptable or asynchronous activity is required.

There is a good argument that you may not need the first group of events and can just sequentially invoke operations on involved aggregates in your command handler which can make the code/workflow more obvious to follow. At the same time I prefer the have highly cohesive handlers that should not be modified as I need to add behavior to the workflow.

You should also consider the way you design your aggregates. An aggregate form a consistency boundary for a group of entities and value objects within it. You should evaluate if the operation spanning multiple aggregates kind of suggests that you may just need to have a single aggregate. But be careful here, smaller aggregates are generally preferred.

But what if my operation requires another action in process and at the same time an integration event to be published? Create two separate event types and raise both. It's a small issue (if an issue at all) but it preserves versatility of the solution.

Prerequisites

For the proposed approach to work you need to make sure to implement what Jimmy Bogard described as a better domain events pattern. In other words your domain entities should not raise events immediately. Instead they should add them to the collection of events that will be processed at around the time that the business operation is committed.

Here's an example of a base Entity class that enables this pattern:

public abstract class Entity<TIdentity> : IEntity
{
    private List<Event> events;

    public void AddEvent(Event @event)
    {
        if (events == null)
        {
            events = new List<Event>();
        }

        events.Add(@event);
    }

    public virtual IEnumerable<Event> CollectEvents() => events;
}

There is a collection of events to be published and the virtual CollectEvents method enables aggregate roots to collect events from child entities.

Another prerequisite is the raisable Event class. I'm using Jimmy Bogard's MediatR library to handle commands and events dispatching so all events should implement INotification marker interface.

public abstract class Event : INotification
{
    public DateTimeOffset OccurredAt { get; set; } = DateTimeOffset.UtcNow;
}

To support eventual events (group 2) we need another base class called IntegrationEvent:

public class IntegrationEvent : Event
{
    public Guid EventId { get; set; } = Guid.NewGuid();
}

These events must be uniquely identifiable so it is possible to determine if an event had already been processed on the receiving side.

A better name for group 2 events would probably be AsynchronousEvent as they can be used to trigger asynchronous actions within the same bounded context as well.

Reliable events flow

Let's have a look at the flow of processing a command (e.g. a web request) that involves working with several aggregates and handling their events.

Reliable events flow

Normally command and event handlers perform 4 distinct tasks when processing requests or events:

  • Rehydrate an appropriate aggregate from the storage
  • Invoke operations on the aggregate
  • Persist the updated aggregate
  • Process events

The last two tasks are what makes this whole story complicated when entities' state and events are separated. In the approach that I'm using these tasks are transformed into the following:

  • Persist the aggregate's changes together with integration (eventual) events (step 4 on the diagram). This step should not commit these changes to the underlying storage. When using EF Core it merely means adding changes and events to the DbContext and saving them to the database yet.
  • Raise atomic events and wait for the completion of their processing (step 5 on the diagram). This can trigger a chain of similar cycles when downstream event handlers raise events of their appropriate aggregates. We're not completing the operation until all events get processed.
  • Commit changes to the storage (step 12 on the diagram). When using EF Core this is when we call SaveChanges on the context.

It works with EF Core really well as by default your database contexts are registered as scoped instances when calling IServiceCollection.AddDbContext meaning that within a given scope (e.g. processing a web request, or a dequeued message) various repositories (which are responsible for various aggregates within the same bounded context) will get injected the same instance of the DbContext. Calling SaveChanges on the context will atomically persist all changes to the database.

Alternately, you could wrap the whole operation in an ambient or explicit transaction and not rely on the Entity Framework's behavior of wrapping the final save operation in a transaction. But be mindful about locks being held for longer periods as event handlers do their work.

Here's an example of the SaveChangesAsync extension method that I'm using that handles all of these tasks:

public static async Task SaveChangesAsync<TEntity>(this IRepositoryWithReliableEvents<TEntity> repository, TEntity entity, CommandContext context) 
            where TEntity : IAggregateRoot, IEntity
{
    var isOwner = context.AcquireOwnership();

    var events = entity.CollectEvents() ?? new List<Event>();

    var integrationEvents = events.OfType<IntegrationEvent>().ToList();
    if (integrationEvents.Any())
    {
        await repository.PersistEventsAsync(integrationEvents.AsReliableEvents(context.SecurityContext));
        context.NotifyWhenDone();
    }
    
    foreach (var @event in events.Except(integrationEvents).OrderBy(evt => evt.OccurredAt))
    {
        await context.Mediator.Publish(@event);
    }

    if (isOwner)
    {
        await repository.SaveChangesAsync();

        if (context.ShouldNotify)
        {
            await context.Mediator.Publish(new EventsAvailableNotification());
        }
    }
}

It requires that repositories implement IRepositoryWithReliableEvents interface that allows it to persist eventual events to the same database context as the aggregates themselves.

public interface IRepositoryWithReliableEvents<TEntity> : IRepository<TEntity> where TEntity : IAggregateRoot, IEntity
{
    Task PersistEventsAsync(IEnumerable<ReliableEvent> events);
    Task SaveChangesAsync();
}

Calling SaveChangesAsync on the actual database context is done by the initial command handler and not the event handlers. This is achieved through the 'ownership' flag on the CommandContext instance. Only the first handler in the chain (which is the command handler) acquires the 'ownership' of the operation and thus is allowed to complete it. The CommandContext is a scoped instance (same as DbContext) and is shared between all handlers.

Here's an example of a command handler to make the picture complete:

public class UpdateFacilityCommandHandler : AsyncRequestHandler<UpdateFacilityCommand>
{
    private readonly IFacilityRepository repository;
    private readonly CommandContext context;

    public UpdateFacilityCommandHandler(IFacilityRepository repository, CommandContext context)
    {
        this.repository = repository;
        this.context = context;
    }

    protected override async Task Handle(UpdateFacilityCommand request, CancellationToken cancellationToken)
    {
        var facility = await repository.FindAsync(request.FacilityId);
        if (facility == null)
        {
            throw new FacilityNotFoundException(request.FacilityId);
        }

        facility.Update(
            request.Name,
            request.Description,
            request.StreetAddress,
            request.Latitude,
            request.Longitude,
            request.Images);

        await repository.UpdateAsync(facility);

        await repository.SaveChangesAsync(facility, context);
    }
}

It's worth repeating that UpdateAsync method on the repository should not call SaveChangesAsync on the DbContext. The same is true for repository methods that add new entities to the context. It has an implication that you cannot use the Identity column to get the database to generate identifiers for new entities. You can still use database managed sequences though (EF Core supports hi-lo pattern and provides AddAsync method on DbContext for that) or choose to generate identifiers yourself.

The EventsAvailableNotification is used to send a message to the eventual events dispatcher that monitors the persisted events in the database and forwards them further (normally to a queue or a topic).

Eventual events

Let's now consider the second part of the reliable events flow which is dispatching of the persisted eventual events.

reliable-events-dispatcher

Steps 1 and 2 on the diagram are what we've already seen the SaveChangesAsync extension method. This is when the job of the original command handler is done and the rest of the processing happens asynchronously relative to the original operation.

Reliable events dispatcher is a singleton background process per bounded context. We need a single instance to manage the persisted events table in the database. We can implement a singleton across service instances using a distributed mutex (the pattern is also known as Leader Election). There are various approaches to implement the mutex, my sample solution uses the blob lease technique (in fact, it's a .NET Core version of the Patterns and Practices team's implementation).

The dispatcher's job is to basically poll the database table periodically and dispatch the events further by sending them to the Service Bus topic. We don't want it to poll the database too often thus it performs checks every 2 minutes. At the same time we want the events to be dispatched sooner after they get raised so the dispatcher also supports a notification through a dedicated queue. We need a separate notification queue per bounded context as the dispatcher may end up running in a different instance of the service as the one processing the request (like on the diagram the dispatcher is running in instance 2 and the request was processed by instance 1).

The events get cleared from the database only when they get successfully sent to the topic.

It's worth noting that this approach can also be applied when you need to run an asynchronous operation within the same bounded context. For instance, you want to call an external service but you don't want to make the current operation wait for the result.

Configuring ASP.NET Core Data Protection in a distributed environment

$
0
0

The ASP.NET Core data protection stack is designed to serve as the long-term replacement for the <machineKey> element in ASP.NET 1.x - 4.x. It's simple to configure and use, yet it provides powerful capabilities such as automatic algorithm selection, encryption key lifetime management and key protection at rest.

When used in a distributed environment it requires a couple of simple configuration steps related to key storage and application isolation.

But why would you want to care? It is used by various ASP.NET Core and SingalR components as well as 3rd party ones. For example, in one project we chose
AspNet.Security.OpenIdConnect.Server
as a middleware for our identity service. The middleware uses Data Protection to protect refresh tokens. Our services are built with ASP.NET Core and deployed to Azure Service Fabric. At some point we've noticed that after we redeploy our application previously issued refresh tokens stop working and the client receives invalid_grant response from the middleware.
It took some time to figure out what was happening because we've already configured persistence of encryption keys in external storage so there had to be something else that was changing during deployment that affected the Data Protection infrastructure.

The answer turned out to lie in the per application isolation feature. By default the physical path of the application is used as a unique application identifier. Upon redeployment to Service Fabric cluster the path changes (in the upgrade scenario it's likely due to service version change but we've also noticed this issue after full redeploy) and the service is unable to decrypt refresh tokens any more even though it uses the same key.

Here's the startup code that we now use in the service that hosts the authentication middleware:

var storageAccount = CloudStorageAccount.Parse(configuration["Configuration key to Azure storage connection string"]);
var client = storageAccount.CreateCloudBlobClient();
var container = client.GetContainerReference("key-container");

container.CreateIfNotExistsAsync().GetAwaiter().GetResult();

services.AddDataProtection()
    .SetApplicationName("Application Name")
    .PersistKeysToAzureBlobStorage(container, "keys.xml");

To summarize, in a distributed environment:

  1. Make sure to persist encryption keys in external storage. Out of the box there are providers available for Azure storage and Redis. You can always plug in your own porvider.
  2. Control the application name which is used by the app isolation mechanism by specifying it with a call to SetApplicationName method.

Implementing optimistic concurrency with EF Core

$
0
0

Entity Framework Core provides built-in support for optimistic concurrency control when multiple processes or users make changes independently without the overhead of synchronization or locking. If the changes do not interfere no further action is required. If there was a conflict then only one process should succeed and others need to refresh their state.

The problem is that the mechanism works during the lifetime of the context while in most realistic scenarios it needs to work across a longer period that involves a roundtrip to the client app and back the server.

Normally it's achieved with the ETag header that is sent to the client with a resource representation and is expected back from the client in the update request.

To propagate the ETag value across application layers we can use a scoped instance of the special ChangeContext:

public class ChangeContext
{
    public int EntityId { get; set; }
    public byte[] Timestamp { get; set; }
}

It's registered as a scoped instance with the DI container so that all components involved in processing the request gets the same instance of the context.

services.AddScoped<ChangeContext>();

The Timestamp is the concurrency token that should be configured in data entities. While it's possible to use arbitrary fields as concurrency tokens often it's easier to use a row version field managed by the database. Official documentation provides details on configuring the concurrency token.

Actions or controllers that require optimistic concurrency control can then be decorated with a custom action filter that is responsible for retrieving the header value before handling the request and sending it back with a response.

public class UseOptimisticConcurrencyAttribute : TypeFilterAttribute
{
    public UseOptimisticConcurrencyAttribute() : base(typeof(UseOptimisticConcurrencyFilter))
    {
    }

    private class UseOptimisticConcurrencyFilter : IActionFilter
    {
        private readonly ChangeContext changeContext;

        public UseOptimisticConcurrencyFilter(ChangeContext changeContext)
        {
            this.changeContext = changeContext;
        }

        public void OnActionExecuting(ActionExecutingContext context)
        {
            if (context.HttpContext.Request.Headers.ContainsKey("ETag"))
            {
                changeContext.Timestamp = Convert.FromBase64String(context.HttpContext.Request.Headers["ETag"]);
            }
        }

        public void OnActionExecuted(ActionExecutedContext context)
        {
            if (changeContext.Timestamp != null)
            {
                context.HttpContext.Response.Headers.Add("ETag", Convert.ToBase64String(changeContext.Timestamp));
            }

            if (context.Exception is ConcurrencyException concurrencyException)
            {
                context.Result = new ConflictObjectResult(concurrencyException);
                context.ExceptionHandled = true;
            }
        }
    }
}

In your read stack at the data layer all you need to do is set the Timestamp property on the ChangeContext to the value read from the data entity. You shouldn't propagate the value as part of your DTO or a representation object. Just inject the ChangeContext into your data source.

In your command (update) stack things get a little more involved but there is nothing extraordinary either. Normally, the update flow is the following: you rehydrate the domain model (or just application level model) from the storage, run some logic on it and send the updated model back to the repository to persist it.

The repository normally gets injected an instance of DbContext and that same context is used to both read and track the data entity that maps to your application model as well as to write back changes derived from the updated application model.

Warning! If you don't follow this flow and instantiate a new instance of DbContext upon each call to the repository then the approach I'm describing here won't work. In this case you should also ask yourself why you're doing it this way and throwing away change tracking capability of EF.

Alright, where were we? You may either come up with a decorator for your repository to add concurrency handling logic:

internal class ConcurrencyHandlingRepository : IMyEntityRepository
{
    private readonly IMyEntityRepository repository;
    private readonly MyDbContext dbContext;
    private readonly ChangeContext changeContext;

    private const string Timestamp = "Timestamp";

    public ConcurrencyHandlingRepository(IMyEntityRepository repository, 
        MyDbContext dbContext, 
        ChangeContext changeContext)
    {
        this.repository = repository;
        this.dbContext = dbContext;
        this.changeContext = changeContext;
    }

    public async Task<int> AddAsync(MyEntity domainModel)
    {
        var id = await repository.AddAsync(domainModel);

        changeContext.EntityId = id;

        return id;
    }

    public async Task<MyEntity> FindAsync(int id)
    {
        var domainModel = await repository.FindAsync(id);

        if (domainModel != null && changeContext.Timestamp != null)
        {
            var trackedEntity = await dbContext.MyEntities.FindAsync(domainModel.Id);
            dbContext.Entry(trackedEntity).OriginalValues[Timestamp] = changeContext.Timestamp;
        }

        changeContext.EntityId = id;

        return domainModel;
    }

    public async Task SaveChangesAsync()
    {
        try
        {
            await repository.SaveChangesAsync();

            // return the updated timestamp to the client
            var trackedEntity = await dbContext.MyEntities.FindAsync(changeContext.EntityId);
            var dbValues = await dbContext.Entry(trackedEntity).GetDatabaseValuesAsync();
            if (dbValues != null)
            {
                changeContext.Timestamp = dbValues[Timestamp] as byte[];
            }
        }
        catch (DbUpdateConcurrencyException ex)
        {
            throw new ConcurrencyException(ex);
        }
    }
}

The approach with the decorator works because by default DbContext is registered as a scoped instance with the DI container so your repository and the decorator will the get the same instance.

There are 3 sets of values tracked by EF Core for your entities:

  • Current values are the values that the application was attempting to write to the database.
  • Original values are the values that were originally retrieved from the database, before any edits were made.
  • Database values are the values currently stored in the database.

It's the original value of the concurrency token that gets compared in SQL updates. Thus the trick to override the value with the one received with ETag in FindAsync method.

Both FindAsync and AddAsync methods also capture the ID of the entity to facilitate logic in SaveChangeAsync method.

SaveChangesAsync does 2 things:

  1. Tries to persist changes to the database catching the possible concurrency conflict error and transforming the error to the custom ConcurrencyException that can be used at the application layer.
  2. Updating the Timestamp value in ChangeContext with the new value which we want to return as ETag to the caller in response to the update operation.

Potential issues to be aware of

In real life applications things often get more complicated. Imagine that some properties of your entity get updated by a background task. Perhaps, it's a remote reference number that you await from an external system or a status field that gets calculated based on a set of conditions that happen in parallel with the user working with the entity.

You certainly don't want the user to be faced with the conflict error message when some properties get updated that he has no influence on and that may not even be visible to her on the UI. You want to think about how you map your business entities to data entities and store things that need to undergo concurrency checks separately from things that shouldn't. Yes, it may not always be the case either, but something to be mindful about.

Another unexpected effect you may run into is when you have chained updated. Suppose your domain model raises an event as a result of an update operation and that event is handled within the same operation scope. As you may have guessed, the second update will overwrite the Timestamp original value of the second entity as all repositories share the same instance of ChangeContext! As a result, the whole operation will fail.

One way of dealing with the second issue is to introduce a one-time timestamp, that is, only the first operation is allowed to use it.

public class ChangeContext
{
    public int EntityId { get; set; }
    public byte[] Timestamp { get; set; }

    private bool timestampTakenOnce = false;

    public byte[] GetTimestampOnce()
    {
        if (!timestampTakenOnce)
        {
            timestampTakenOnce = true;
            return Timestamp;
        }

        return null;
    }
}

The repository should use the GetTimestampOnce() instead of the property getter to drive its logic in FindAsync method.

Implementing hybrid authentication in Azure

$
0
0

It's not uncommon for enterprises moving their applications to the cloud to require hybrid authentication that enables SSO for internal users who authenticate with their corporate credentials across cloud and on-premises resources and applications.

There is another aspect to hybrid authentication that involves customer facing applications. Customers access these applications with their individual accounts, often preferring to re-use credentials of an external identity provider such as GitHub or Facebook. Still, internal users have certain administrative roles in these applications and need to access them using their corporate credentials.

Yet another aspect of hybrid authentication is collaboration between organizations when employees of a partner organization access resources of the current organization. Traditionally this has been solved using guest accounts but there has to be a better way.

When designing an authentication solution for an application running in the cloud that's going to be accessed by different types of users you need to answer a few questions:

  • How are you going to integrate with your on-premises AD?
  • Do you want to maintain a local database for individual accounts or do you want to go with some of the SAAS offerings available?
  • How are you going to marshal authentication requests to appropriate identity providers?
  • How are you going to authorize access to the application once a user has been authenticated?

Integration with on-premises AD

Answering the first question you would probably be evaluating federation with AD FS vs Azure Active Directory.

AD FS is a Windows Server role that exposes endpoints supporting various claims-based identity protocols. As it's running on the domain-joined servers it enables Intergrated Windows Authentication giving internal users SSO experience. It also gives you full control over the authentication process: it happens on-premises, you can customize claims and you can set up third party multi-factor authentication (MFA) providers.

On the other hand, it's another farm of servers to maintain to insure high availability. AD FS requires administrative access to provision applications. And it may have a limited protocol support depending on the server version. AD FS v3 (Windows Server 2012 R2) supports SAML2, WL-Federation, WS-Trust and authorization code grant OAuth2 flow. However, Windows Server 2016 brings support for all OAuth2 and OpenID Connect flows.

Azure Active Directory is a highly available global authentication provider. It enables SSO across your on-premises and cloud applications (through Azure AD Connect) as well as external applications such as Office 365 or VSTS or even your partner organizations' apps. It supports modern protocols (as well as classic SAML and WS-Federation) and there are client libraries available to streamline development of server-side and client-side applications.

Azure AD is a multi-tenant system that enables automatic provisioning of apps in consuming tenants (organizations) without any explicit work from administrators.

The way you integrate Azure AD with your on-premises AD is by using Azure AD Connect. There are 3 options to choose from depending on a particular organization's security policy:

  • Password hash synchronization to the cloud;
  • Pass-through authentication over an agent installed in the domain (password hashes never leave your network);
  • Federation with AD FS (if you still require full control over the authentication process performed on-premises and the ability to use a third party MFA provider; Azure AD will redirect the user to the AD FS sign-in page).

The first two options enable seamless SSO when corporate users accessing the application from domain-joined devices don't need to type in their passwords and sometimes even type in their user names. The feature relies on JavaScript emitted on the Azure AD sign-in page that tries to obtain a Kerberos ticket from the domain controller and send it to Azure AD. Azure AD is able to validate the ticket and complete the sign-in process as it receives the shared secrets as part of the Azure AD Connect configuration.

This feature is not applicable when you use federation with AD FS though because the latter is running on the domain-joined servers it can validate Kerberos tickets directly so corporate users get their SSO experience too.

However, with Azure AD you can have SSO across your on-premises applications and third party applications running in the cloud or in the partners' networks (given that they use Azure AD). Accessing your partner's applications using your corporate credentials is another killer feature in Azure AD referred to as B2B collaboration. No more guest account management, and at the same time you have fine-grained control over what resources your partners can access.

Individual accounts

You can choose to go the good old way of storing credentials of individual external user accounts in the database and implementing all the expected functionality in your application related to account management. That includes account registration, credentials validation, password reset flow and so on. And all of that is not part of your app domain! It has nothing to do with your business. Yet, it adds considerable development effort and an increased security risk when something is not done right.

Going with a proven middleware such as IdentityServer or OpenIddict would be the right choice and mitigate most of these issues.

Alternatively, you could have a look at SAAS offerings such as Azure AD B2C. It supports all self-service scenarios (sign-up, password reset, profile editing), allows you to fully customize its UI pages, enable MFA with a single checkbox, and easily integrate social identity providers.

Routing authentication requests

One of the possible hybrid authentication scenarios is an application that is accessed by internal users (employees) and customers. Employees are redirected to Azure AD or AD FS so they can use their corporate credentials. They expect SSO and they need to undergo any security policy set up in their organization (regular password change, MFA, etc). Customers are redirected to another system where they can enter their individual credentials. How do we route authentication requests to the chosen identity providers?

A straight-forward (and arguably a cleaner one from the architectural standpoint) approach could be grouping components by actor. We might end up with internally and externally facing apps and corresponding sets of backend services configured for a particular identity provider.

But what if we don't have this luxury and it's a single application accessed from different entry points (DNS names)? Of what if our workflow implies common backend with tailored functionality per user type?

What if we don't want to couple with a particular identity provider?

A feasible answer to questions 3 and 4 mentioned earlier would be implementing a federation gateway between your application and identity providers.

Federated-authentication--generic-

The gateway has two purposes:

  1. Routing authentication requests from different clients to their respective identity providers;
  2. Issuing application specific tokens that are used by the clients to access application services. The gateway is also responsible for refreshing access tokens.

With the federation gateway we abstract from the identity providers' details (protocols, token formats, claims) and end up with a stable unified identity that we fully control.

For the gateway to work we need to identify clients. It can be conveniently done with clientId which is an essential parameter used in OpenID Connect and OAuth2 protocols. Different clientId can be assigned to application instances exposed over public and internal DNS names and/or to different application client types (e.g. web based management dashboard and mobile customer apps).

Implementation of the federation gateway is not a trivial task but with the middleware such as IdentityServer4 it becomes a lot more doable. Check out the official documentation for details.

Viewing all 60 articles
Browse latest View live